Hamptons style kitchen renovation in Hurstville South with study nook
We built a brand new kitchen in this home in Hurstville South
A classic Hamptons style kitchen renovated with a bold monochromatic black-and-white palette. Its more dramatic and graphic than a typical Hamptons kitchen, with no warm timber or brass to soften the contrast.
- White shaker profile throughout all wall and base cabinets
- Small dark bronze knob hardware — the traditional Hamptons detail (notably different from the brass bar pulls in the previous two kitchens)
- Near-black/dark charcoal painted island base in the same shaker profile — the hero design decision
- Full-height Miele appliance tower column built to exact appliance dimensions
- Concealed rangehood above the cooktop run

Custom designed kitchen renovations in Hurstville South

Our kitchen design renovation scope of work
Some design combinations are timeless for a reason.
Black and white.
Shaker cabinetry.
Subway tiles.
Matte pendants.
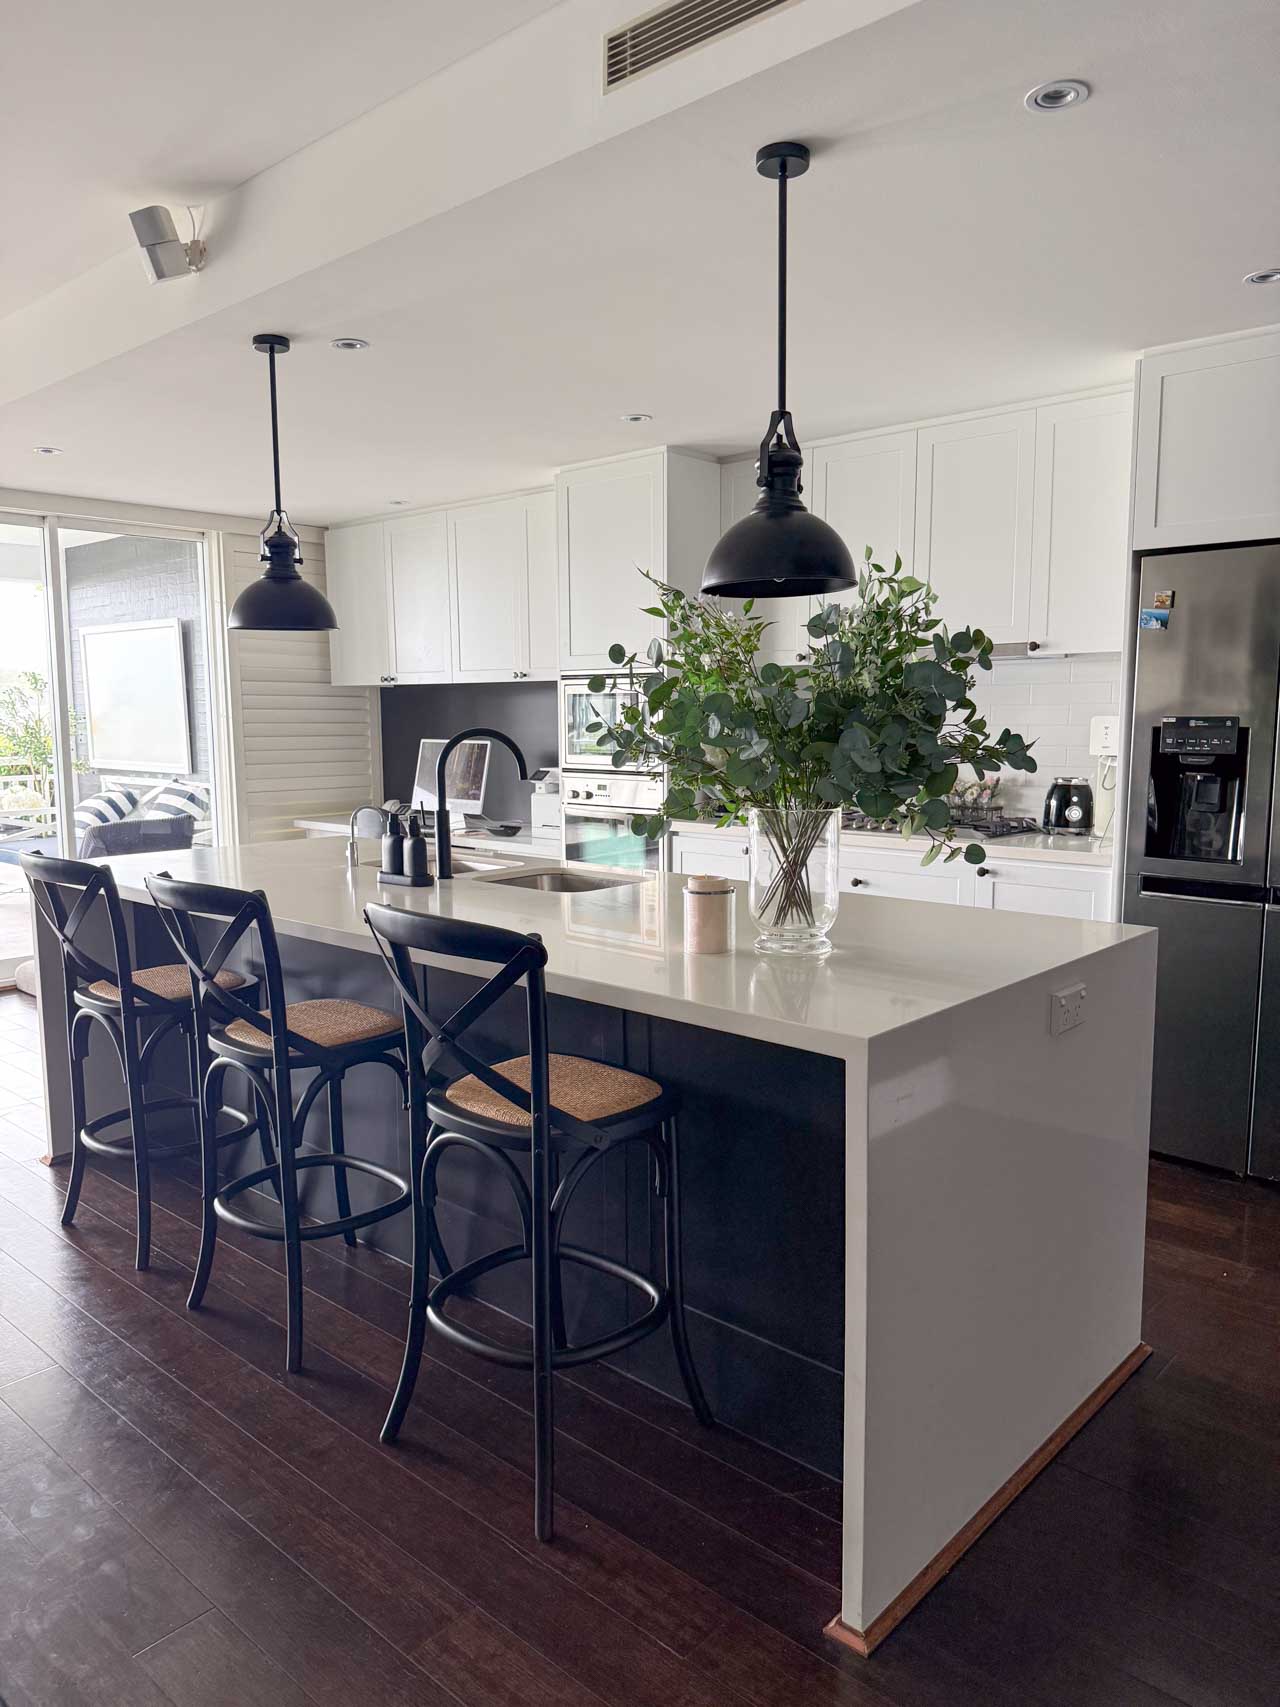
Cross-back stools.
Each one a classic in its own right and when they’re brought together with the care and precision this Hurstville South renovation demonstrates, the result is a kitchen that feels both deeply familiar and completely fresh.
When the homeowners came to Nu Trend, they weren’t chasing a trend. They wanted a kitchen that would look as good in fifteen years as it does today.
A kitchen that could handle a serious cook, a busy household and a life lived around a benchtop. What they got was a full custom Hamptons kitchen custom built from the ground up, designed around their exact space, and finished with a bold monochromatic palette that gives this classic style a distinctly modern edge.
A kitchen design in black and white
This kitchen is rooted firmly in Classic Hamptons style with the most enduringly popular kitchen aesthetic in Australian renovation. Shaker profile cabinetry in crisp white, subway tile splashbacks, stone benchtops, pendant lights with an industrial-farmhouse character, and cross-back bar stools. These are the signature ingredients of the style, and they are all present and accounted for here.
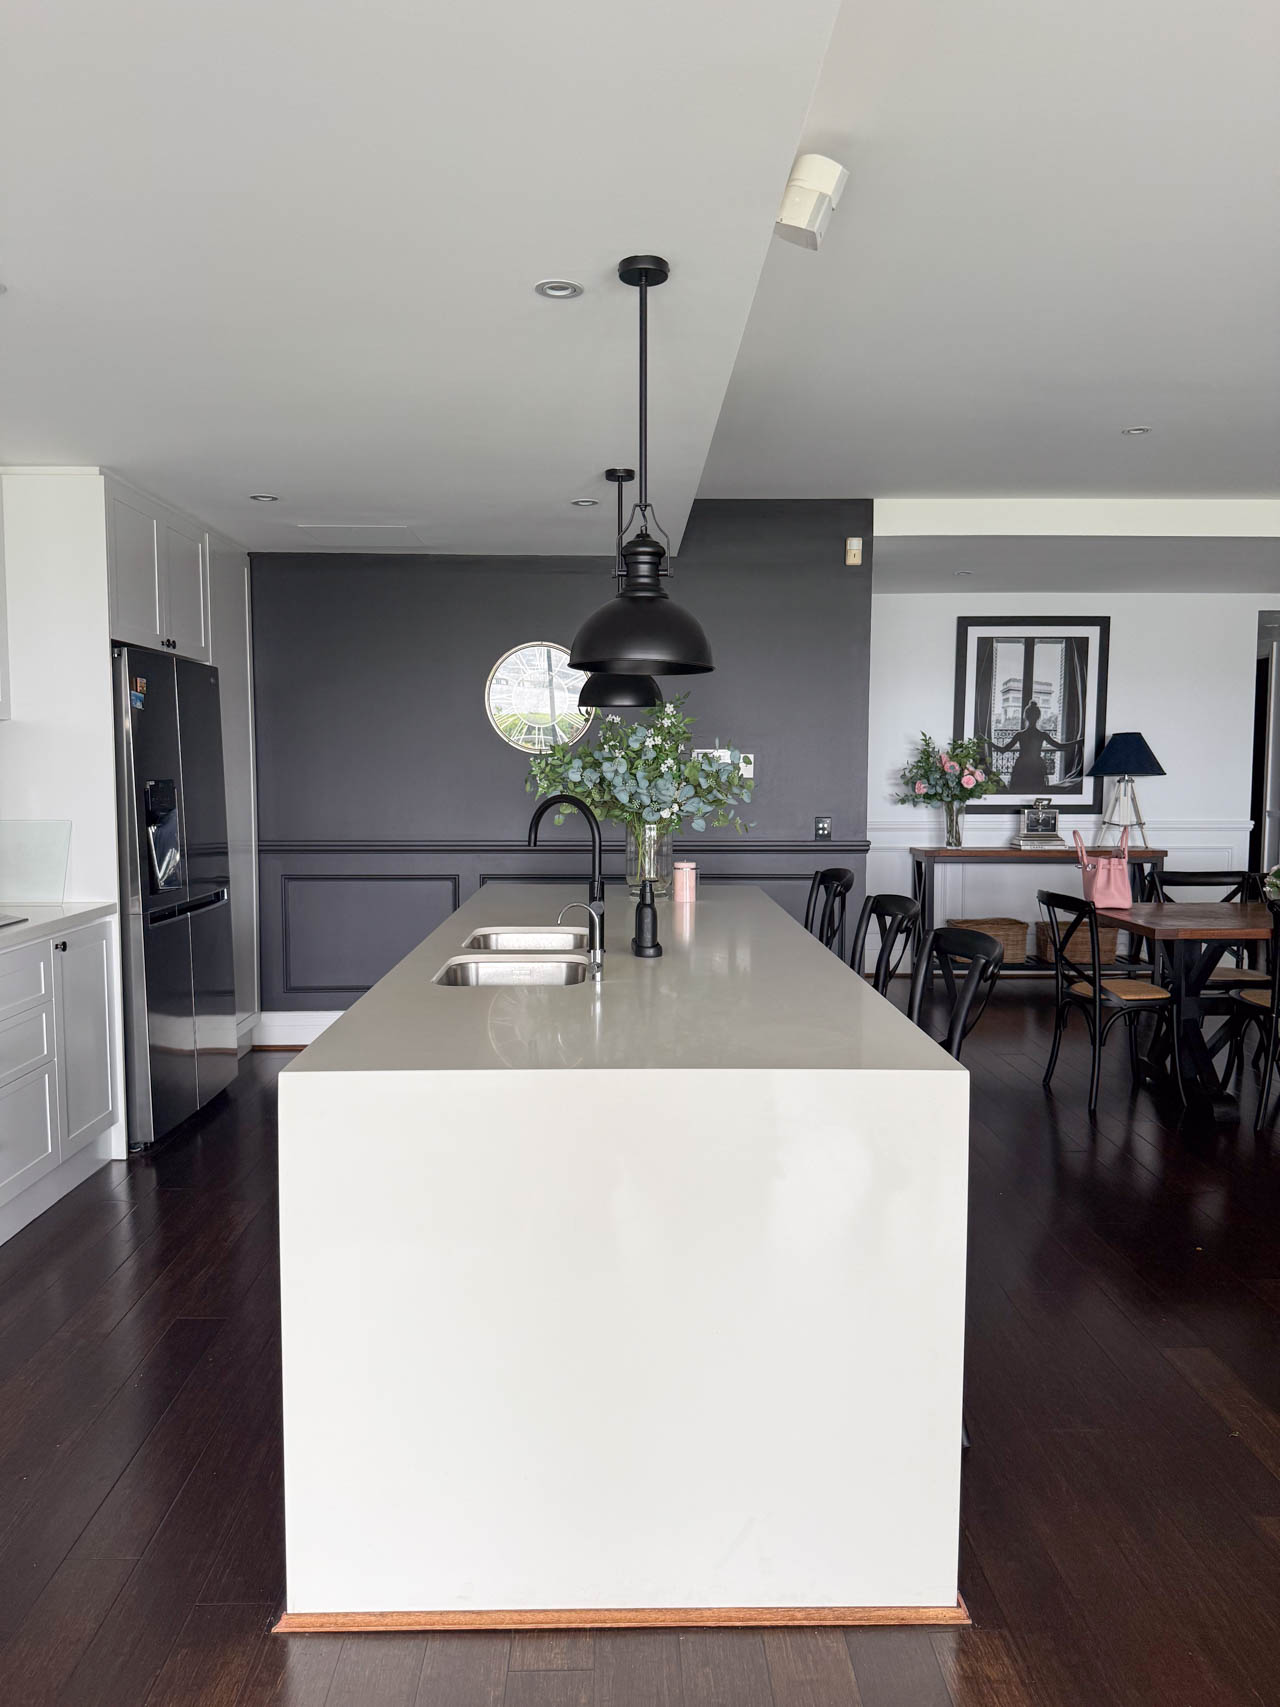
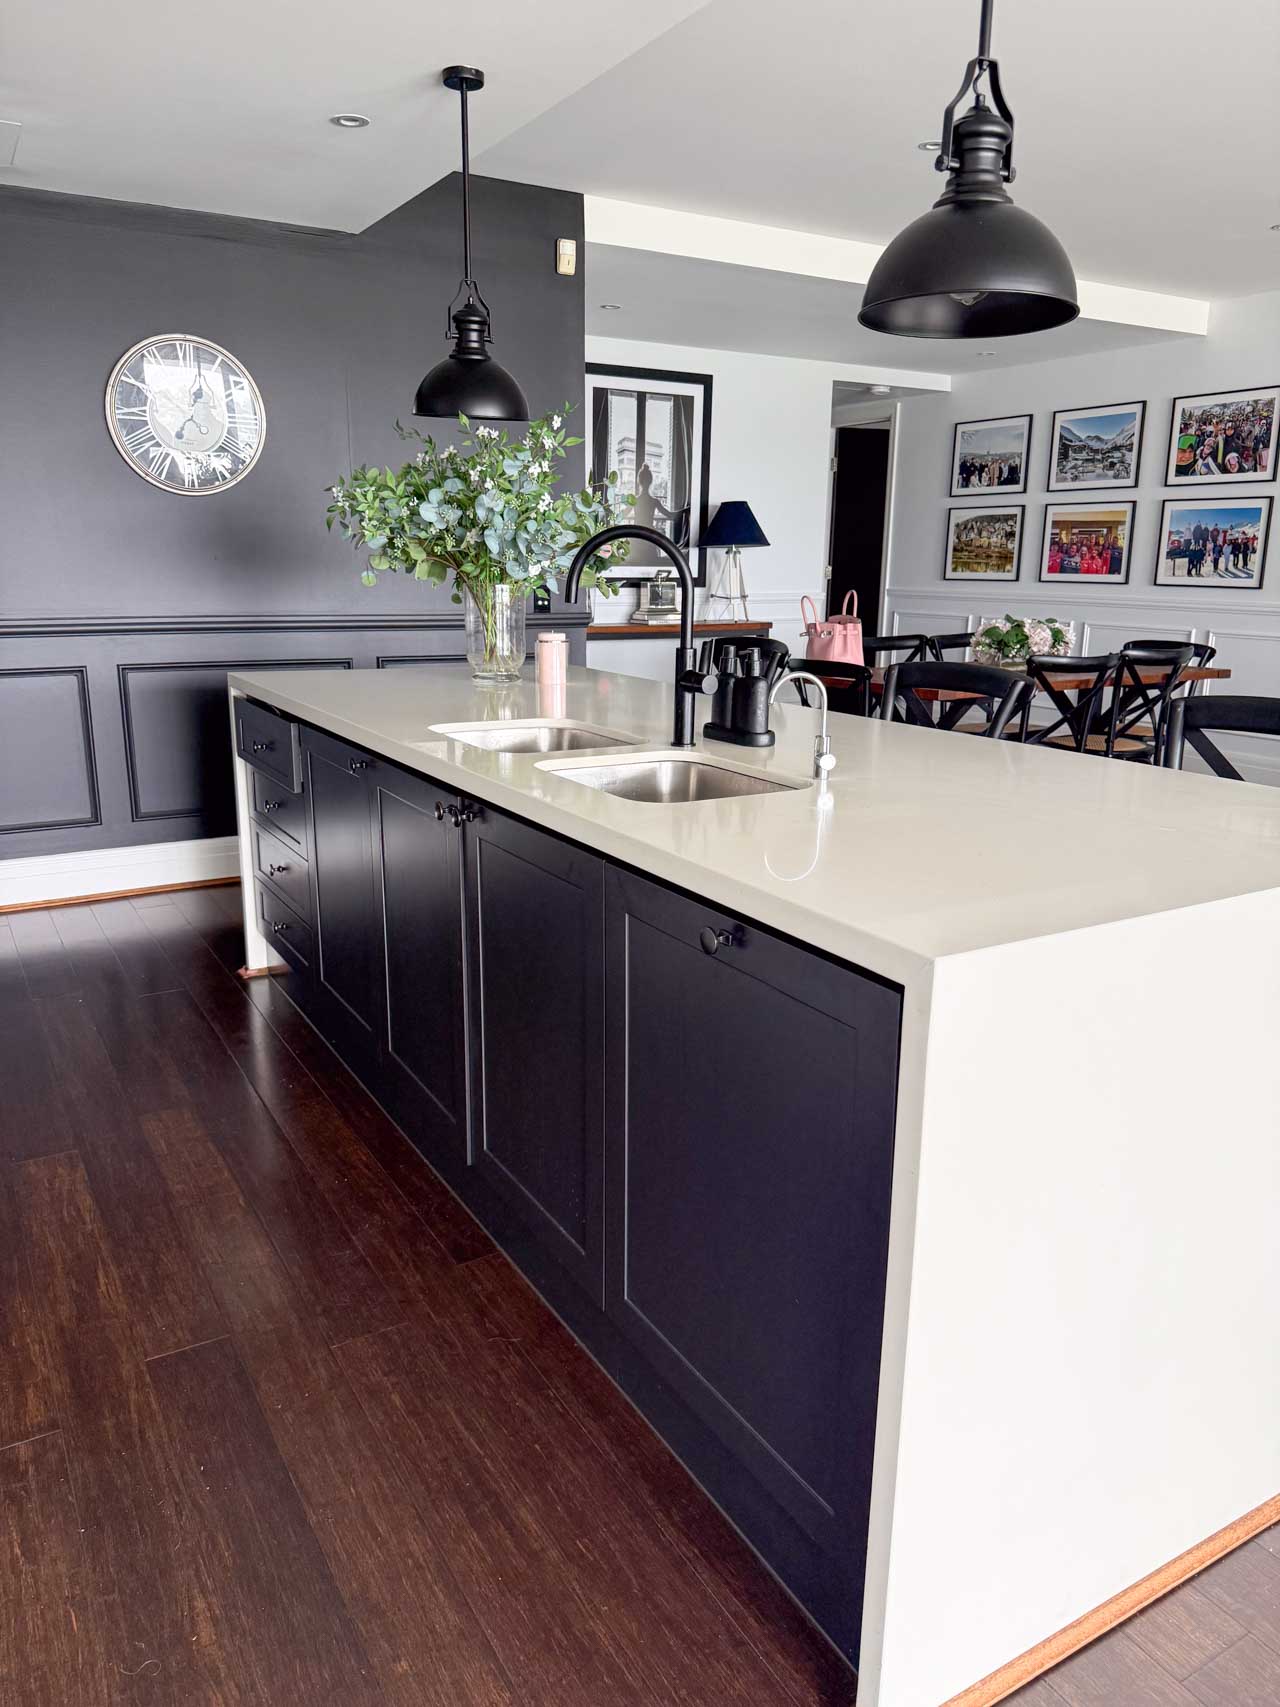
What makes this kitchen distinctive within the Hamptons genre is the commitment to a bold monochromatic palette. Rather than introducing timber accents, warm metals, or colour to break up the white, this kitchen doubles down with a dramatic near-black island base that creates an immediate and striking visual contrast.
The result is a Hamptons kitchen with genuine graphic impact, sophisticated, bold, and completely confident in its choices.
The supporting cast reinforces this decision at every turn: matte black tapware, matte black pendant lights, matte black hardware accents, and dark chocolate timber flooring.
Every element either belongs to the white camp or the black camp, and nothing sits ambiguously between them. This kind of disciplined palette control is the mark of a kitchen designed with intention.
A kitchen with custom designed cabinetry
Doors and cupboards
The shaker door profile is synonymous with Hamptons style for good reason — its simple, recessed-panel geometry has a timeless architectural quality that transcends trends.
Although, as with all timeless things, there is an enormous difference between a well-executed shaker kitchen and a poorly executed one.
The difference is always in the details, and the details here are excellent.


Two tone cabinet colours
The wall cabinetry runs the length of the kitchen in a bright, clean white shaker profile — uppers, lowers, and a full-height tower column on the left that houses the stacked appliance bank.
The shaker detail is consistent and precise across every door and drawer face: the inset panel depth, the rail and stile proportions, and the reveals between adjacent cabinet faces are uniform throughout.
Home office zone in the kitchen
Visible in the wider kitchen shots is a dedicated home office zone adjacent to the kitchen — a desk, monitor, printer, and task chair set into the open-plan space.
Rather than being a separate room, the study is integrated into the same floor level as the kitchen, sharing the same flooring, the same architectural language, and the same visual field.
This kind of multi-use open-plan thinking is increasingly central to how Australians design their homes, and a kitchen renovation of this scope accommodated it not just spatially but stylistically ensuring the kitchen cabinetry and palette would work in harmony with the adjacent work zone rather than in competition with it.

Other unique features of this kitchen renovation design
Every cabinet was designed and manufactured specifically for this space. The tower column that frames the stacked Miele appliances is a custom-built unit — dimensioned to the exact width and height of the two appliances it houses, with upper cabinet storage above completing the full-height run.
The rangehood is integrated behind custom cabinetry above the cooktop, keeping the wall completely clean and continuous. None of this is achievable with off-the-shelf flat-pack carcasses, which come in fixed incremental sizes and leave gaps, awkward reveals, and mismatched depths that visually undermine the integrity of the design.
Small dark knob hardware
The wall cabinetry hardware is small, dark bronze-toned knobs — a deliberately traditional choice that nods to the Hamptons style’s heritage influences. This is not the long bar pull or the knurled T-bar of a contemporary kitchen. It is a small, understated knob that sits flush against the shaker face, adding just enough visual punctuation without competing with the door profile itself.
It is a quiet detail, but it matters. The choice of hardware communicates the style intent of a kitchen more clearly than almost any other single element. These knobs say: this is a classic kitchen, and it knows it.
The Island is dramatically dark
If the wall cabinetry provides the light, the island provides the shadow. The island base is finished in a deep, near-black dark colour — likely a custom paint finish in a charcoal or deep navy, applied to shaker profile cabinetry. The contrast against the white wall cabinetry and bright stone benchtop is immediate and dramatic.
The island base uses the same shaker profile as the wall cabinetry, maintaining design coherence while the colour change transforms its character entirely. It reads almost as a piece of furniture — a dark credenza or a painted French Provincial sideboard — set into the kitchen space rather than built as part of it. This furniture-quality impression is one of the hallmarks of a well-designed two-tone kitchen, and it is only convincing when the cabinetry quality is high enough to support the comparison.
The island end panels are finished in the same white as the benchtop overhang — a deliberate choice that softens the dark mass of the island when viewed from the seating side, giving the bench an airy, open quality that a fully dark-wrapped island would not achieve.
Making the stone the star of the show

The benchtops throughout — both the wall run and the island — are finished in a pure, clean white engineered stone, most likely a Caesarstone or similar, in a near-solid white with minimal movement. This is not a marble-look stone with dramatic veining. It is confidently plain.
This choice is deliberate and exactly right for the style. A heavily veined stone in this kitchen would compete with the visual weight of the dark island base, the subway tiles, and the bold pendant lights.
The clean white stone instead provides a calm, neutral surface that unifies the cabinetry, reflects the natural light, and lets the strong design elements around it do their work without distraction.
The Island Benchtop The island top overhangs generously to the seating side, providing comfortable bar clearance for the cross-back stools without the need for a visible support bracket. The edge profile is a simple flat or pencil-round edge — again, the classic Hamptons choice.
The Undermount Sink Set into the island benchtop is a rectangular undermount single-bowl sink in stainless steel. The undermount configuration keeps the stone surface completely clean and uninterrupted, with no raised rim to collect water or debris. The stainless finish introduces a third metallic note that bridges the gap between the dark hardware and the bright stone.
Using subway tiles for a splash back in a kitchen renovation

Forget the mess
The wall splashback is finished in white ceramic subway tiles — the most iconic splashback choice in the Hamptons repertoire, and one that remains popular precisely because it is almost impossible to tire of. In a kitchen this boldly two-toned, the subway tiles serve a crucial role: they provide texture and pattern in the wall zone without adding colour, keeping the monochromatic palette completely intact.
The tiles are laid in the traditional horizontal brick-bond pattern, with white grout that allows the tile pattern to read clearly without the grout becoming a dominant visual element. The format and scale of the tile — classic 75mm × 150mm or similar — is proportionate to the shaker door profile and to the overall scale of the kitchen, creating a cohesive visual rhythm across the back wall.
Where the dark grey charcoal feature wall begins — to the left of the cooking zone — the tiles stop, reinforcing the reading of the cooking zone as a distinct, bounded area within the larger kitchen.
This kitchen was designed around a commitment to serious cooking, and the appliances reflect that unambiguously.
For those who love to cook
- Miele Stacked Tower – the left-hand tower column houses a Miele double appliance stack — a Miele combination microwave/steam oven above and a Miele multifunction oven below. Both appliances are in Miele’s stainless steel finish, and both are built into the custom cabinetry column at an ergonomic height that eliminates the need to bend down to the traditional under-bench oven position.
Miele is the benchmark for German kitchen appliance engineering, and choosing a double Miele tower represents a significant commitment to cooking performance and longevity. These appliances are designed to work at a professional level for decades, and the custom cabinetry was built to accommodate them precisely — with the correct ventilation clearances, the correct opening dimensions, and the correct electrical provisions built in at rough-in stage.
- 5-Burner Gas Cooktop – the cooktop is a 5-burner gas model set into the stone benchtop, with cast iron grates and stainless steel burner caps. The gas cooktop is the choice of serious home cooks — the immediate, responsive heat of an open flame is not replicated by any induction system, and this household clearly knows exactly what they want from a cooking surface.
- LG French Door Refrigerator – to the right of the cooking zone stands a large stainless steel LG French door refrigerator — freestanding rather than integrated. In this kitchen, the freestanding refrigerator works because the scale of the appliance is appropriate for the space, and the stainless steel finish aligns with the Miele appliances and the undermount sink, creating a consistent metallic thread through the kitchen.
How our renovation company designed and built this kitchen
A project of this scope requires the coordination of multiple licensed trades, carefully sequenced over several weeks. Here is what the process involves from start to finish:
Consultation & Design —
The Nu Trend team works with the homeowners to establish the design brief, cabinetry layout, appliance selection, material choices, and hardware finishes. The two-tone palette, the Miele appliance tower, the island configuration, and all stone and tile selections are confirmed before any work begins on site.
Demolition —
The existing kitchen is fully stripped — cabinets, benchtops, appliances, tiles, and any relevant flooring are removed and cleared from site. Any hidden structural or services issues discovered at this stage are assessed and addressed before trades begin.
Plumbing Rough-In —
The plumber relocates or extends water supply and waste lines to the new island sink position. Existing connections under the wall benchtop may be re-used or repositioned depending on the new layout.
Electrical Rough-In —
New circuits are run for the Miele oven, Miele microwave/steam oven (each on dedicated circuits), gas cooktop ignition, refrigerator, dishwasher, island power outlets, and downlights. Pendant light positions are confirmed and wired to rough-in stage.
Gas Rough-In —
The gas line to the new cooktop position is run, tested, and inspected by a licensed gasfitter before any cabinetry is installed over or around it.
Cabinetry Manufacturing —
While site works proceed, the custom cabinetry is manufactured in the Nu Trend workshop. Every door, drawer, and carcass is built to the exact dimensions of this specific kitchen. The tower column is manufactured to the precise clearances of the Miele appliances. Shaker doors are cut, profiled, primed, and painted. The dark island base is prepared and finished. Every component is checked before leaving the workshop.
Cabinet Installation —
Cabinetry is delivered to site and installed over multiple days. The appliance tower column is erected and aligned first, setting the datum for the remainder of the run. Wall and base cabinets are levelled, secured, and fitted. The island is positioned, levelled, and fixed.
Stonemason Templating —
With cabinetry fully installed, the stonemason templates the benchtop runs and island surface. Stone is cut and fabricated off-site.
Tile Installation —
Subway tiles are laid to the splashback zone, with grout colour confirmed and applied. The tile pattern is checked for alignment and consistency.
Stone Installation —
Benchtops and island top are delivered and installed. Seam positions (if any) are confirmed with the client prior to installation.
Appliance Installation & Gas Fit-Off —
The Miele oven and microwave/steam oven are set into the tower column and connected by a licensed electrician. The gas cooktop is installed and connected by a licensed gasfitter, with the connection tested and certified.
Electrical Fit-Off —
Downlights, pendant light fittings, island power outlets, and all switches are installed. Pendant drops are set at the correct height above the island surface.
Plumbing Fit-Off —
The undermount sink, matte black tapware, and dishwasher connections are installed and tested.
Hardware & Final Joinery —
Cabinet knobs are installed and aligned across all door and drawer faces. Soft-close hinges and drawer runners are adjusted. All cabinet faces are inspected and any touch-ups completed.
Final Inspection & Handover —
The completed kitchen is cleaned, the homeowners are walked through all appliances and finishes, and Nu Trend’s warranty documentation is provided.

