Hamptons style kitchen renovation in Annandale with natural stone
We built a brand new kitchen in this home in Annandale
Hamptons contemporary kitchen with shaker profile cabinetry, natural marble stone, and brushed brass hardware done with clean, modern restraint rather than traditional ornate Hamptons detailing.
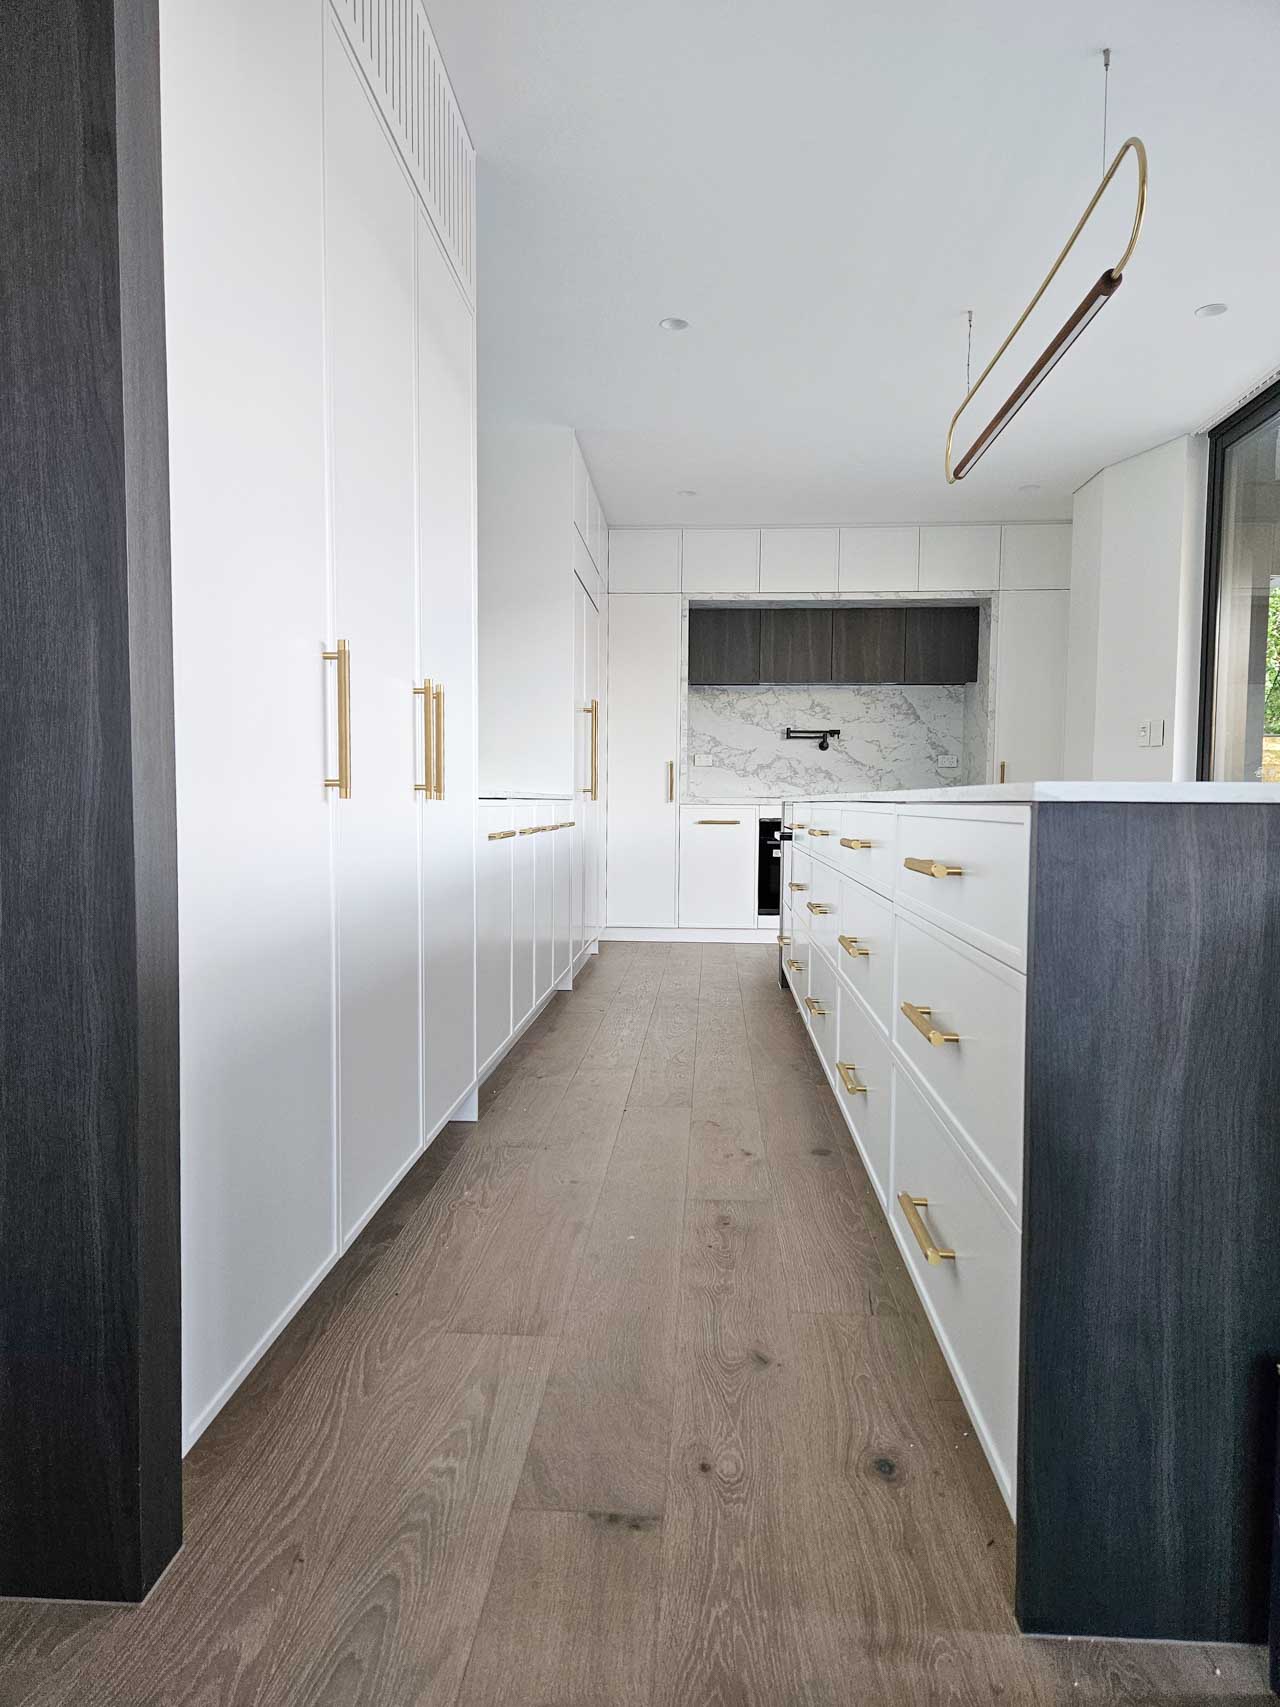
- White shaker doors and drawers throughout the primary kitchen body
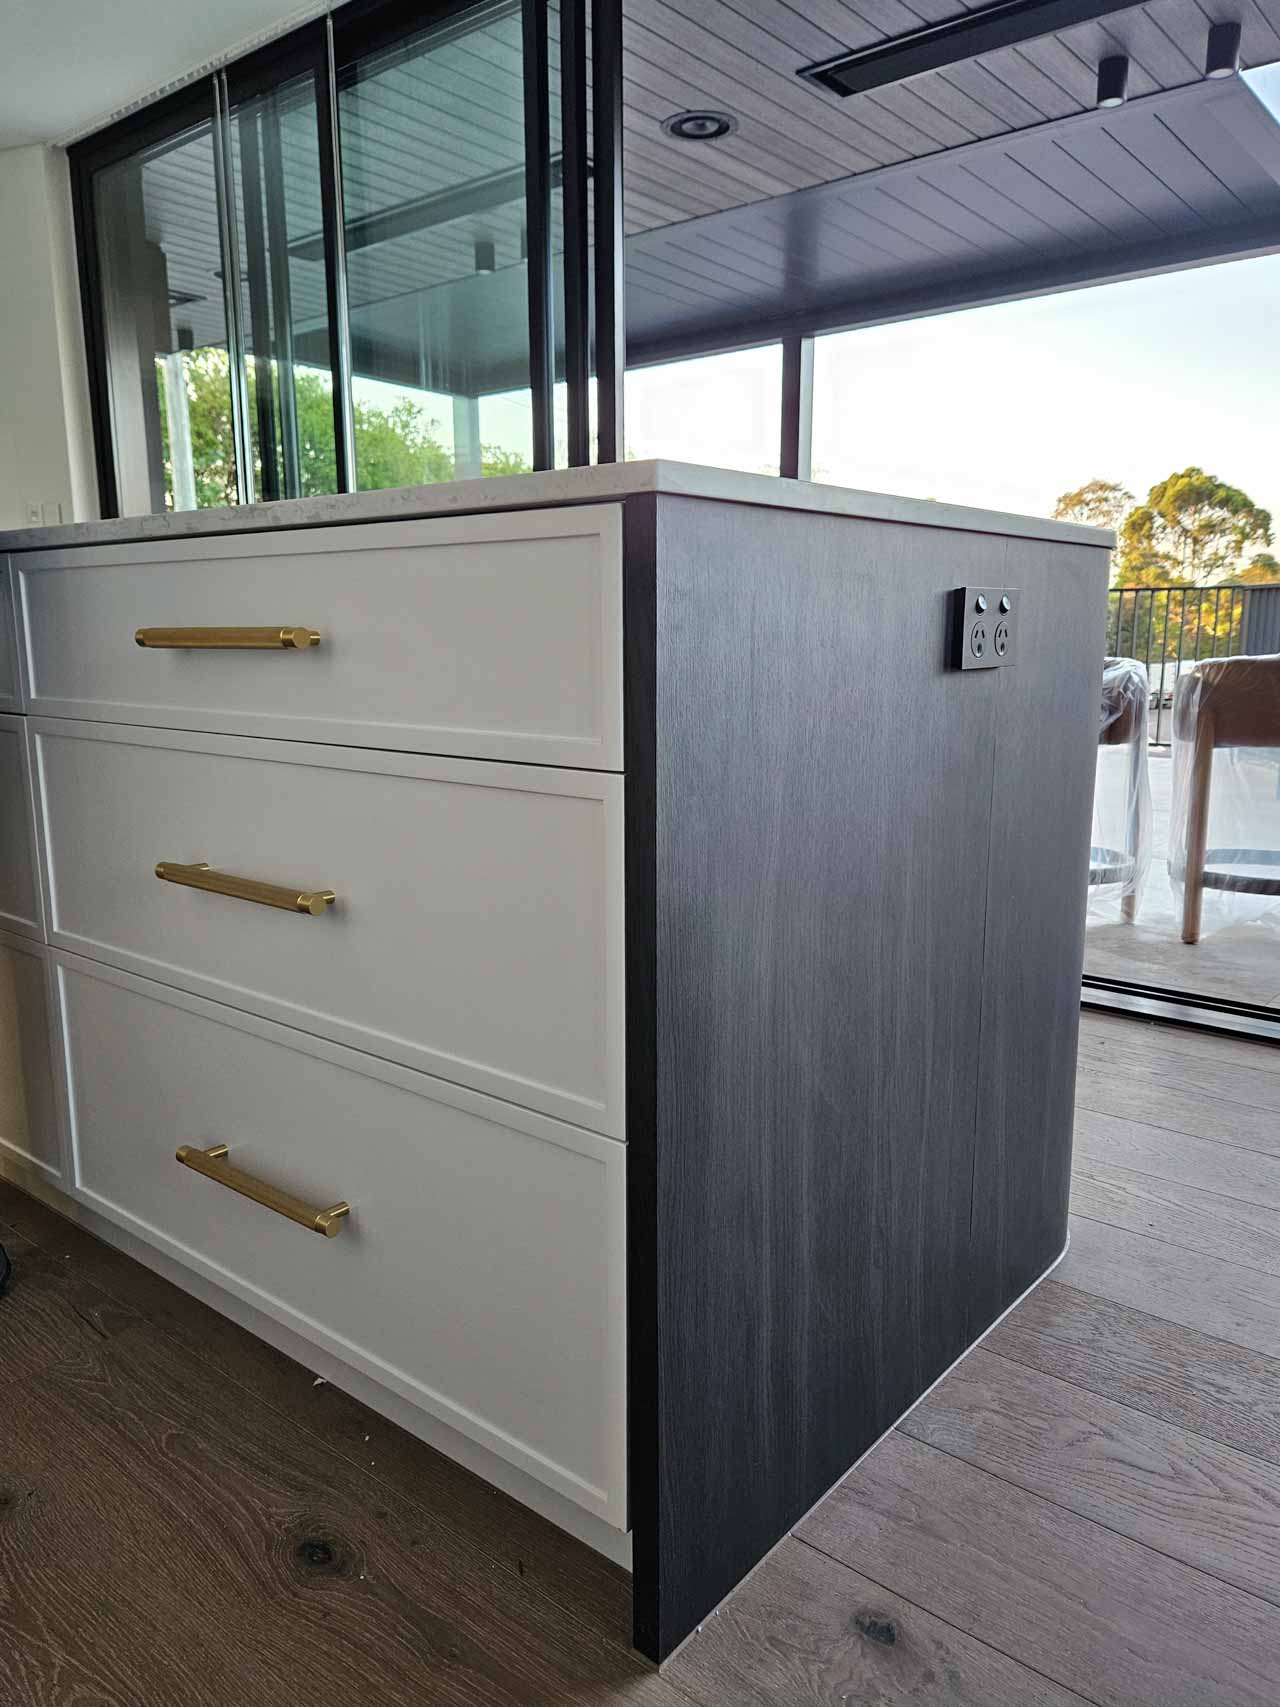
- Contrasting dark charcoal timber grain used as intentional accent zones — cooking alcove inner uppers and island end panel
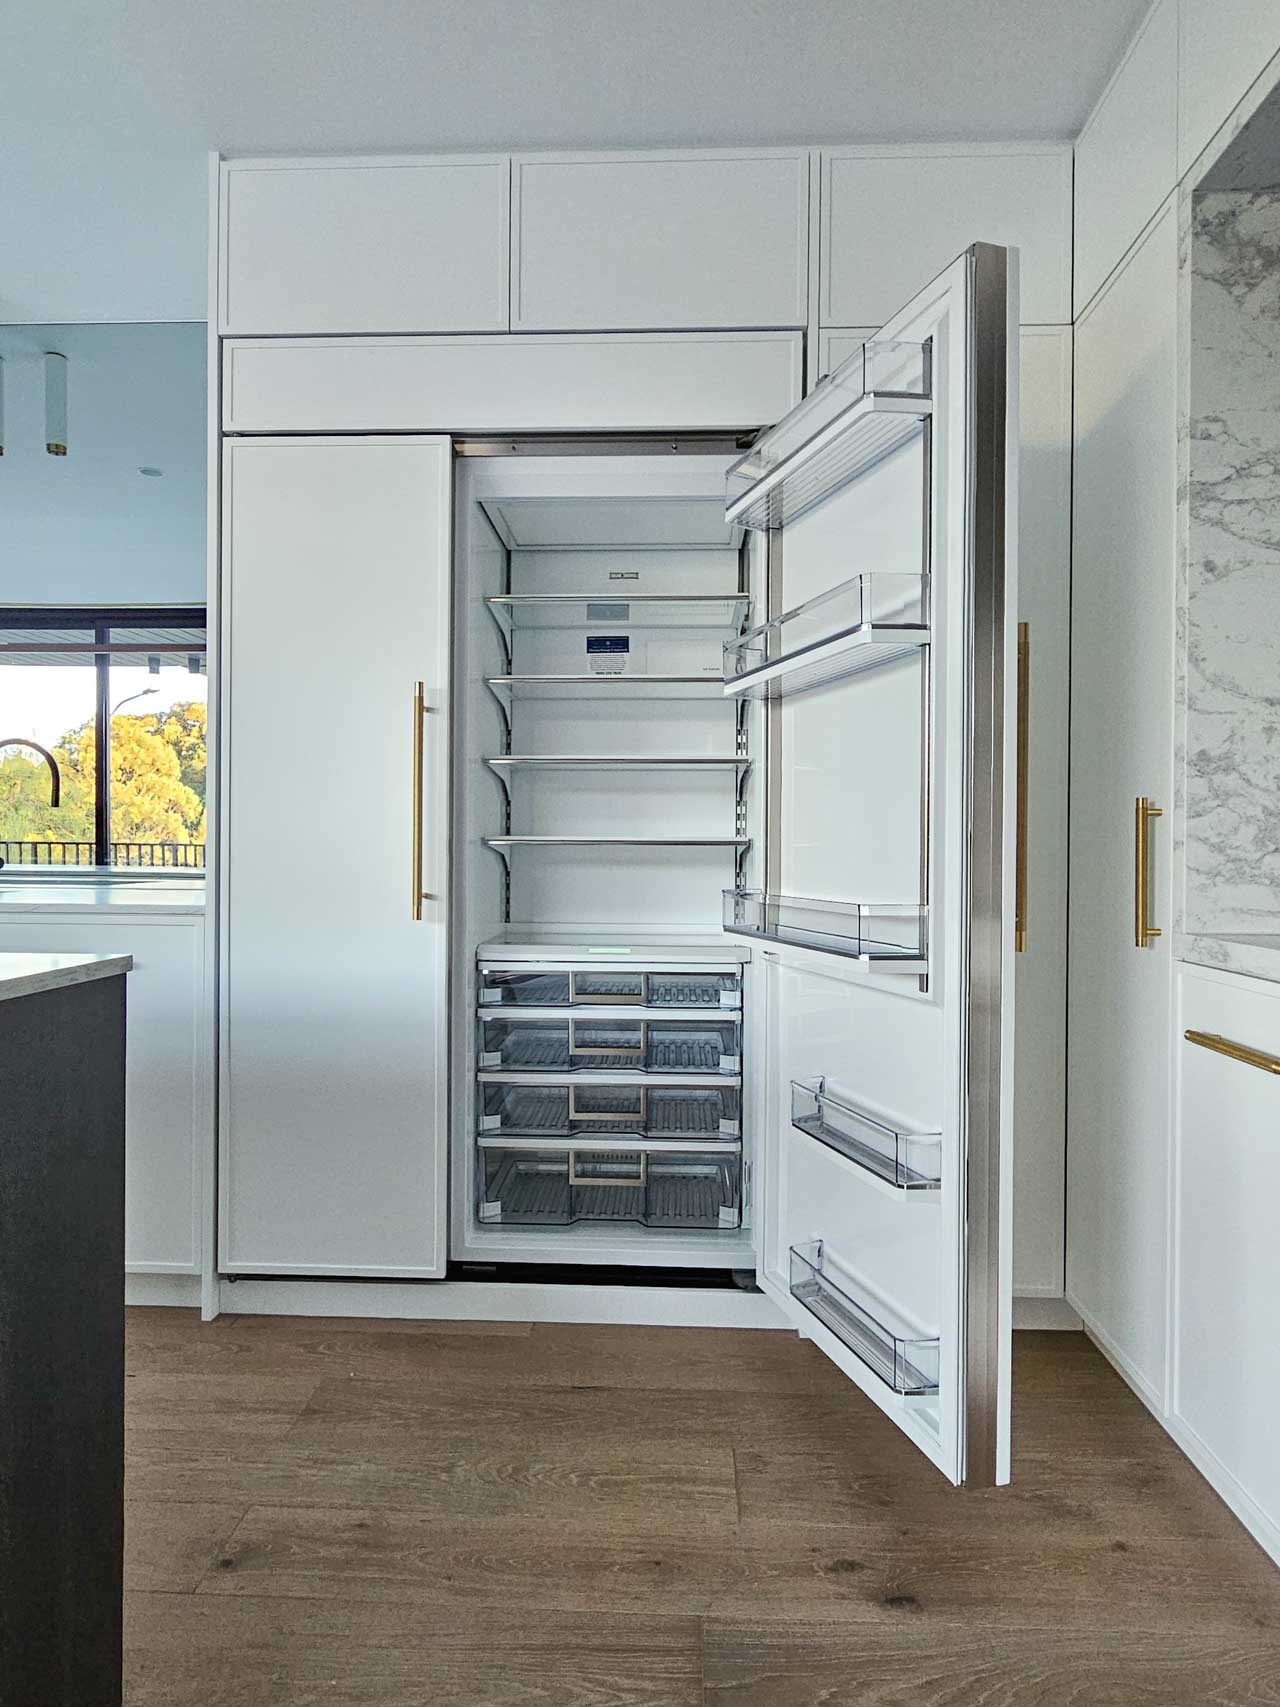
- Integrated full-height refrigerator surround with custom matching shaker panels
- Floor-to-ceiling cooking alcove with flanking tower columns
- Knurled T-bar pulls in brushed brass — the standout design detail across all six images
- Three handle lengths used consistently at different scales throughout

Custom designed kitchen renovations in Annandale

Our kitchen design renovation scope of work
There’s a reason the Hamptons style has never gone out of fashion in Australian homes and this Annandale kitchen renovation is a masterclass in why.
When the homeowners approached Nu Trend, they wanted something timeless rather than trendy, something layered rather than stark, and something that felt unmistakably custom rather than pulled off a showroom floor.
What they got was a beautifully resolved kitchen renovation that takes the hallmarks of the Hamptons aesthetic and grounds them in a distinctly contemporary Australian context but complete with a built-in study nook, premium two-tone cabinetry, and hardware so considered it deserves its own close-up.
A kitchen design that uses natural stone
This kitchen occupies a very specific and sought-after design territory: Hamptons Contemporary. It takes the signature elements of classic Hamptons style with its shaker profile cabinetry, white painted finishes, natural stone, and polished brass accents and strips away anything overly ornate, replacing it with cleaner lines, bolder contrasts, and a more refined material palette.
The result is a kitchen that reads as sophisticated and composed rather than coastal-casual. It has the warmth and character of a Hamptons kitchen without the nautical references.
Crucially, it’s been designed for how people actually live in Sydney these days.
The key design decisions that define this style here:
- Shaker profile doors and drawers in a crisp, bright white — the DNA of Hamptons cabinetry
- Knurled brushed brass hardware as the signature accent and jewellery of the space
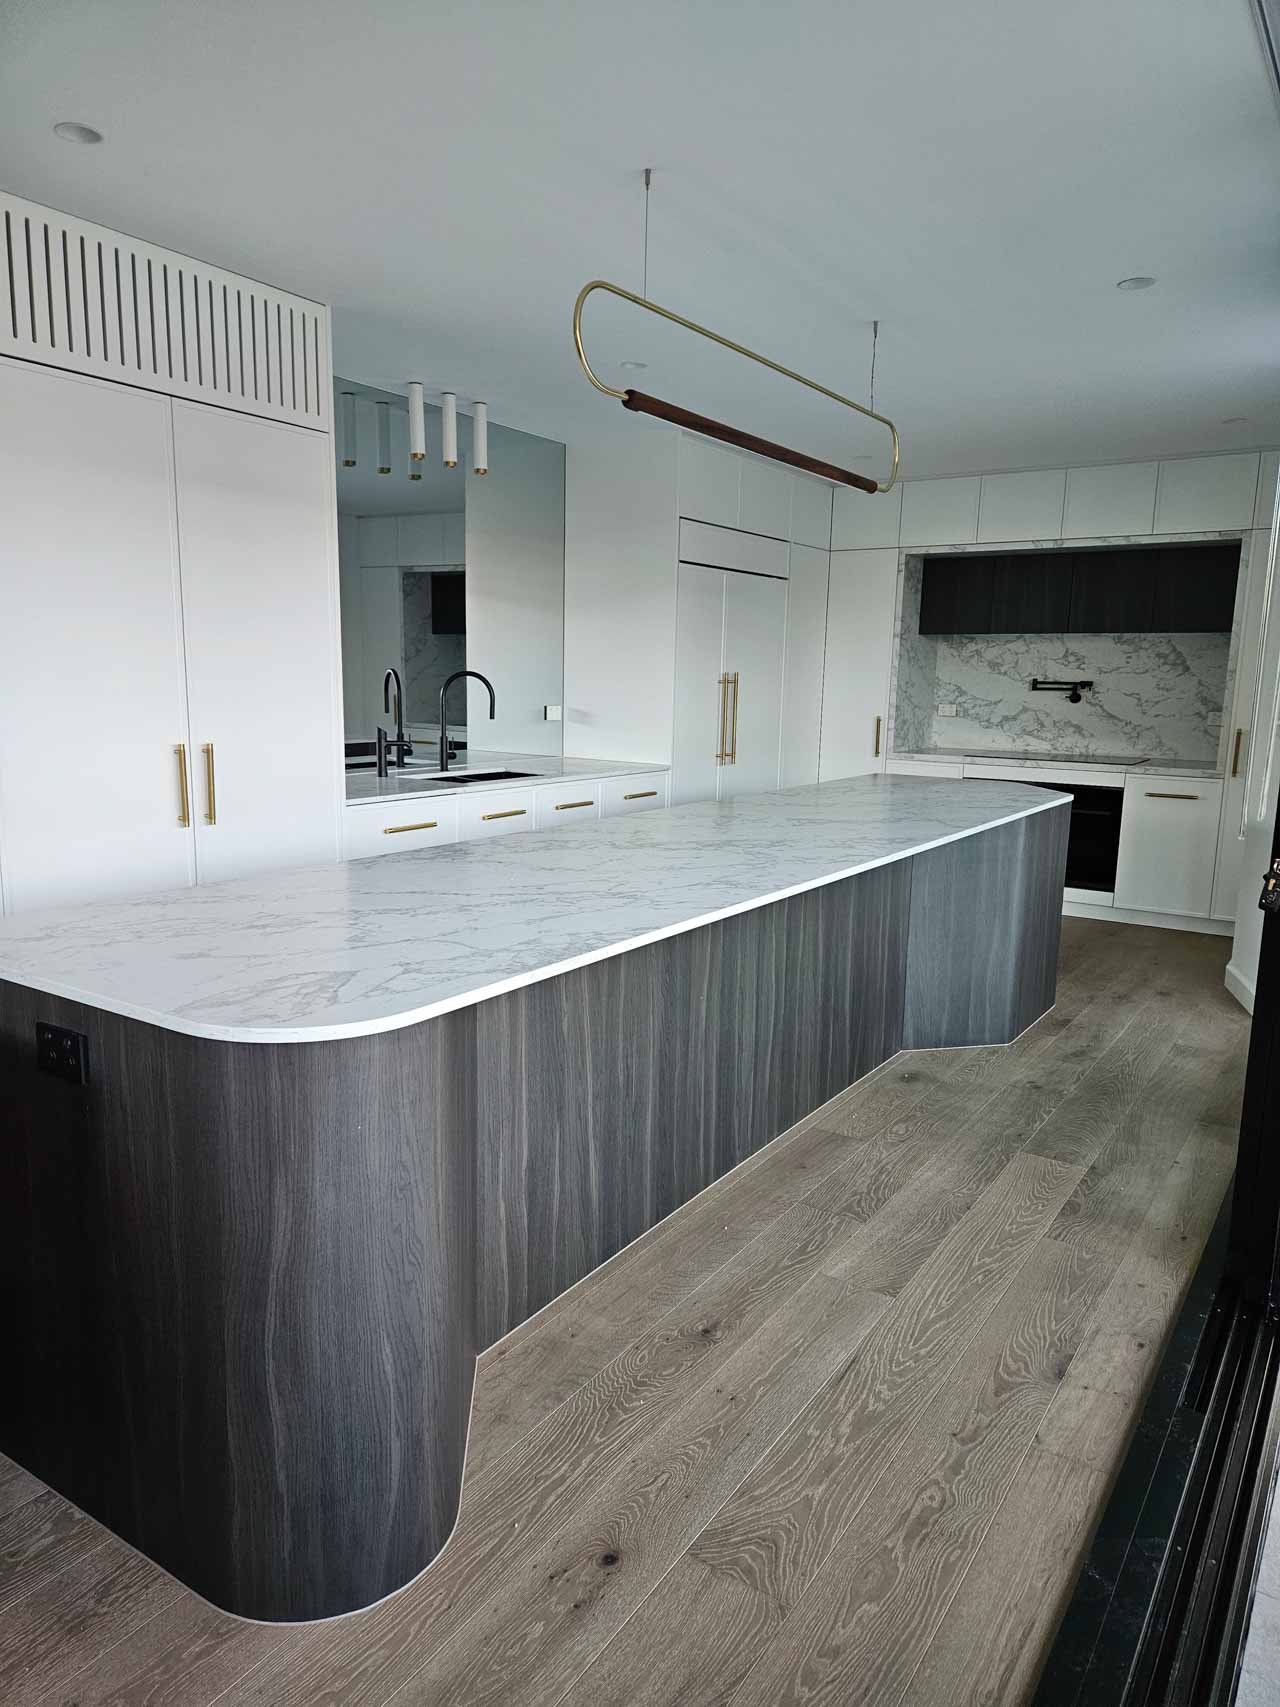
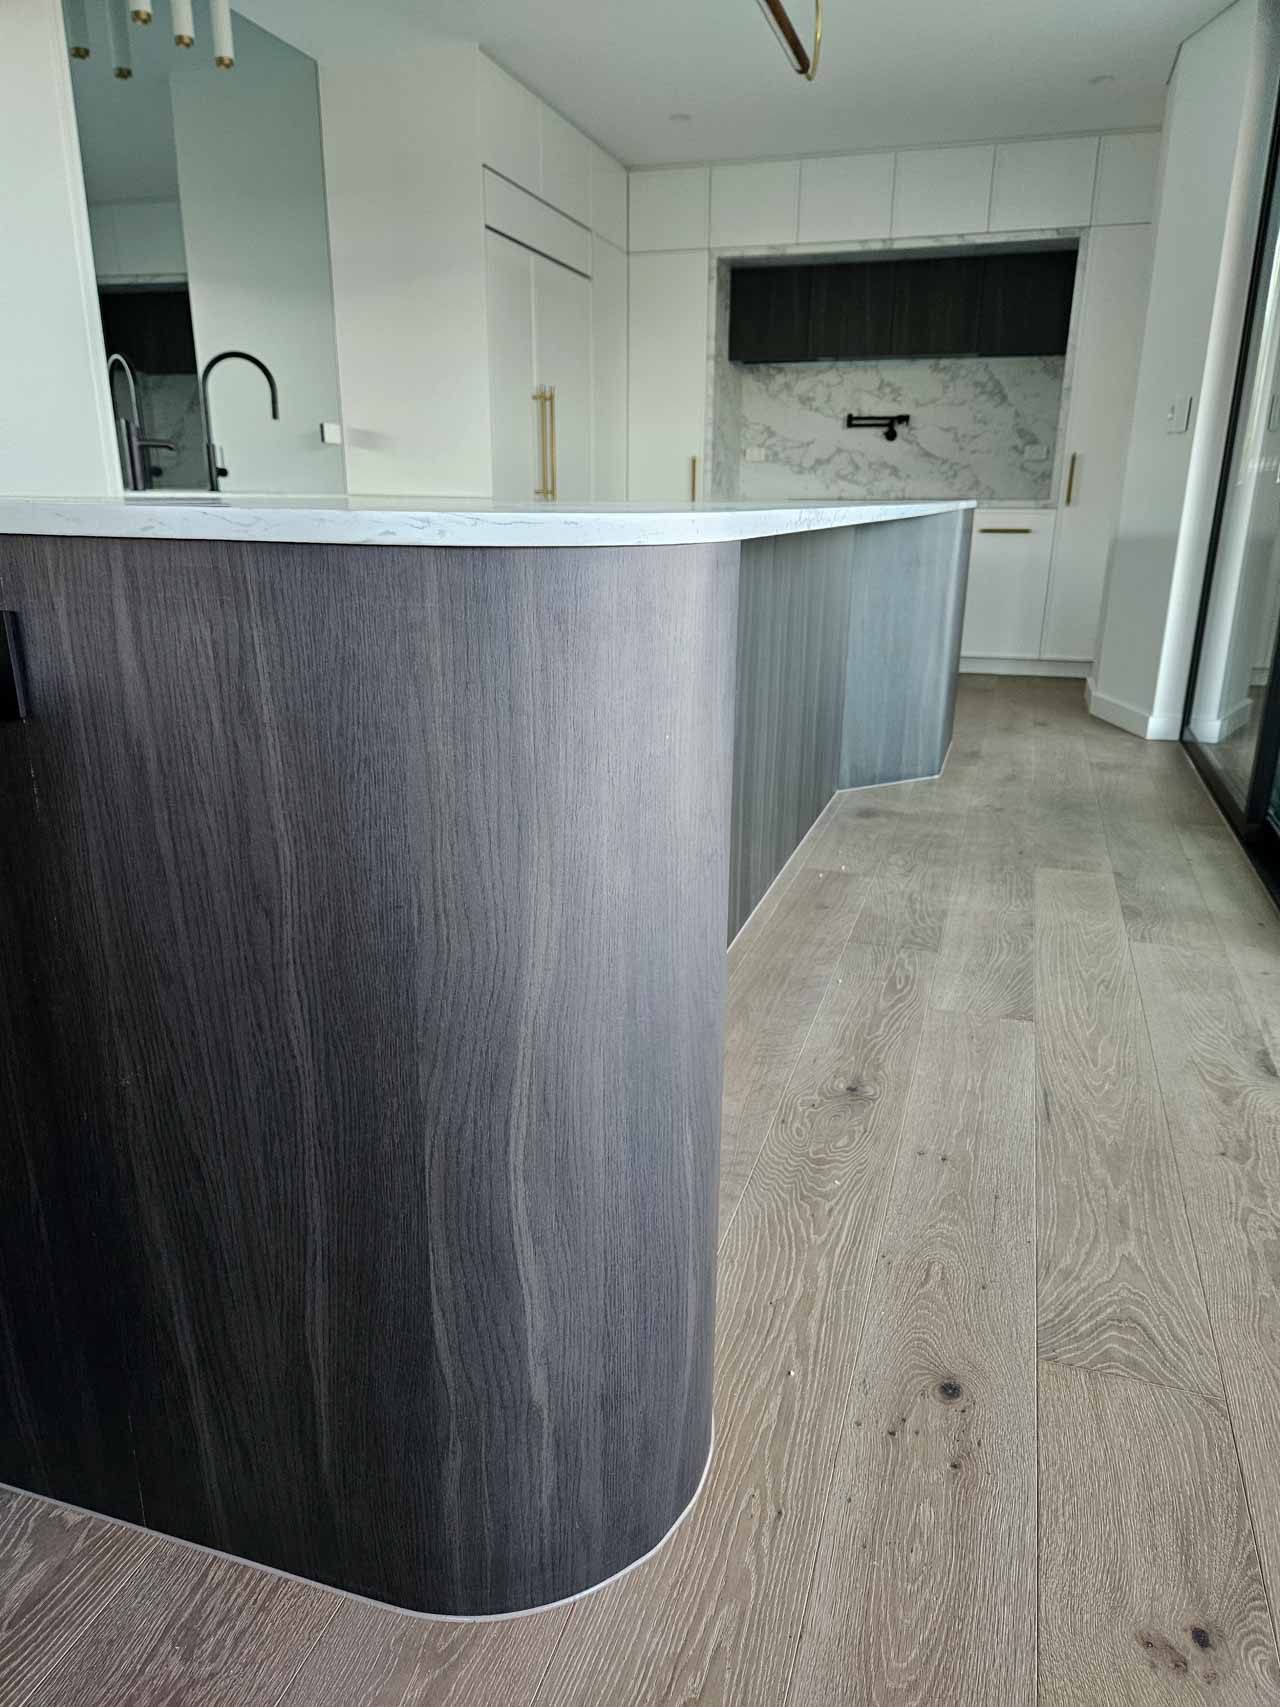
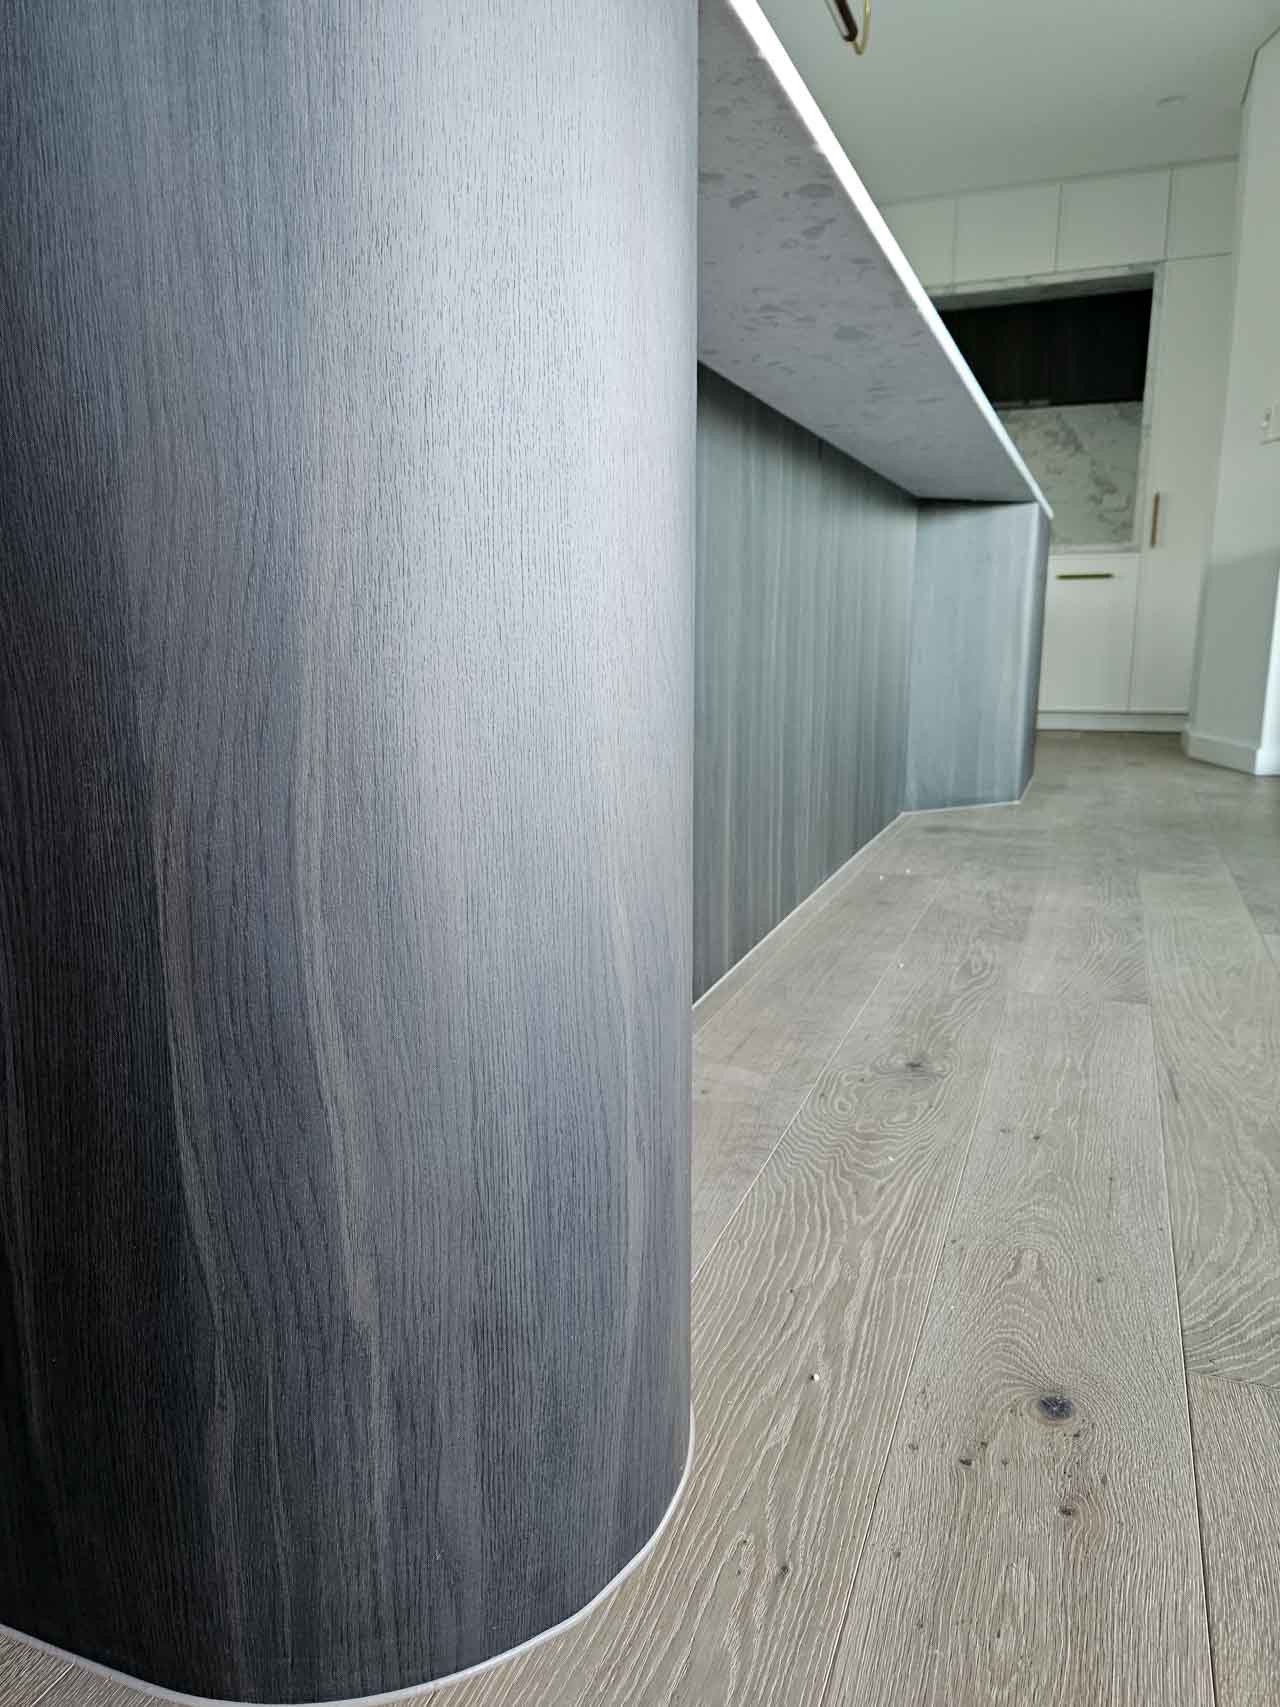
- Dramatic two-tone cabinetry — white shaker for the primary kitchen body, dark charcoal timber grain for accent zones
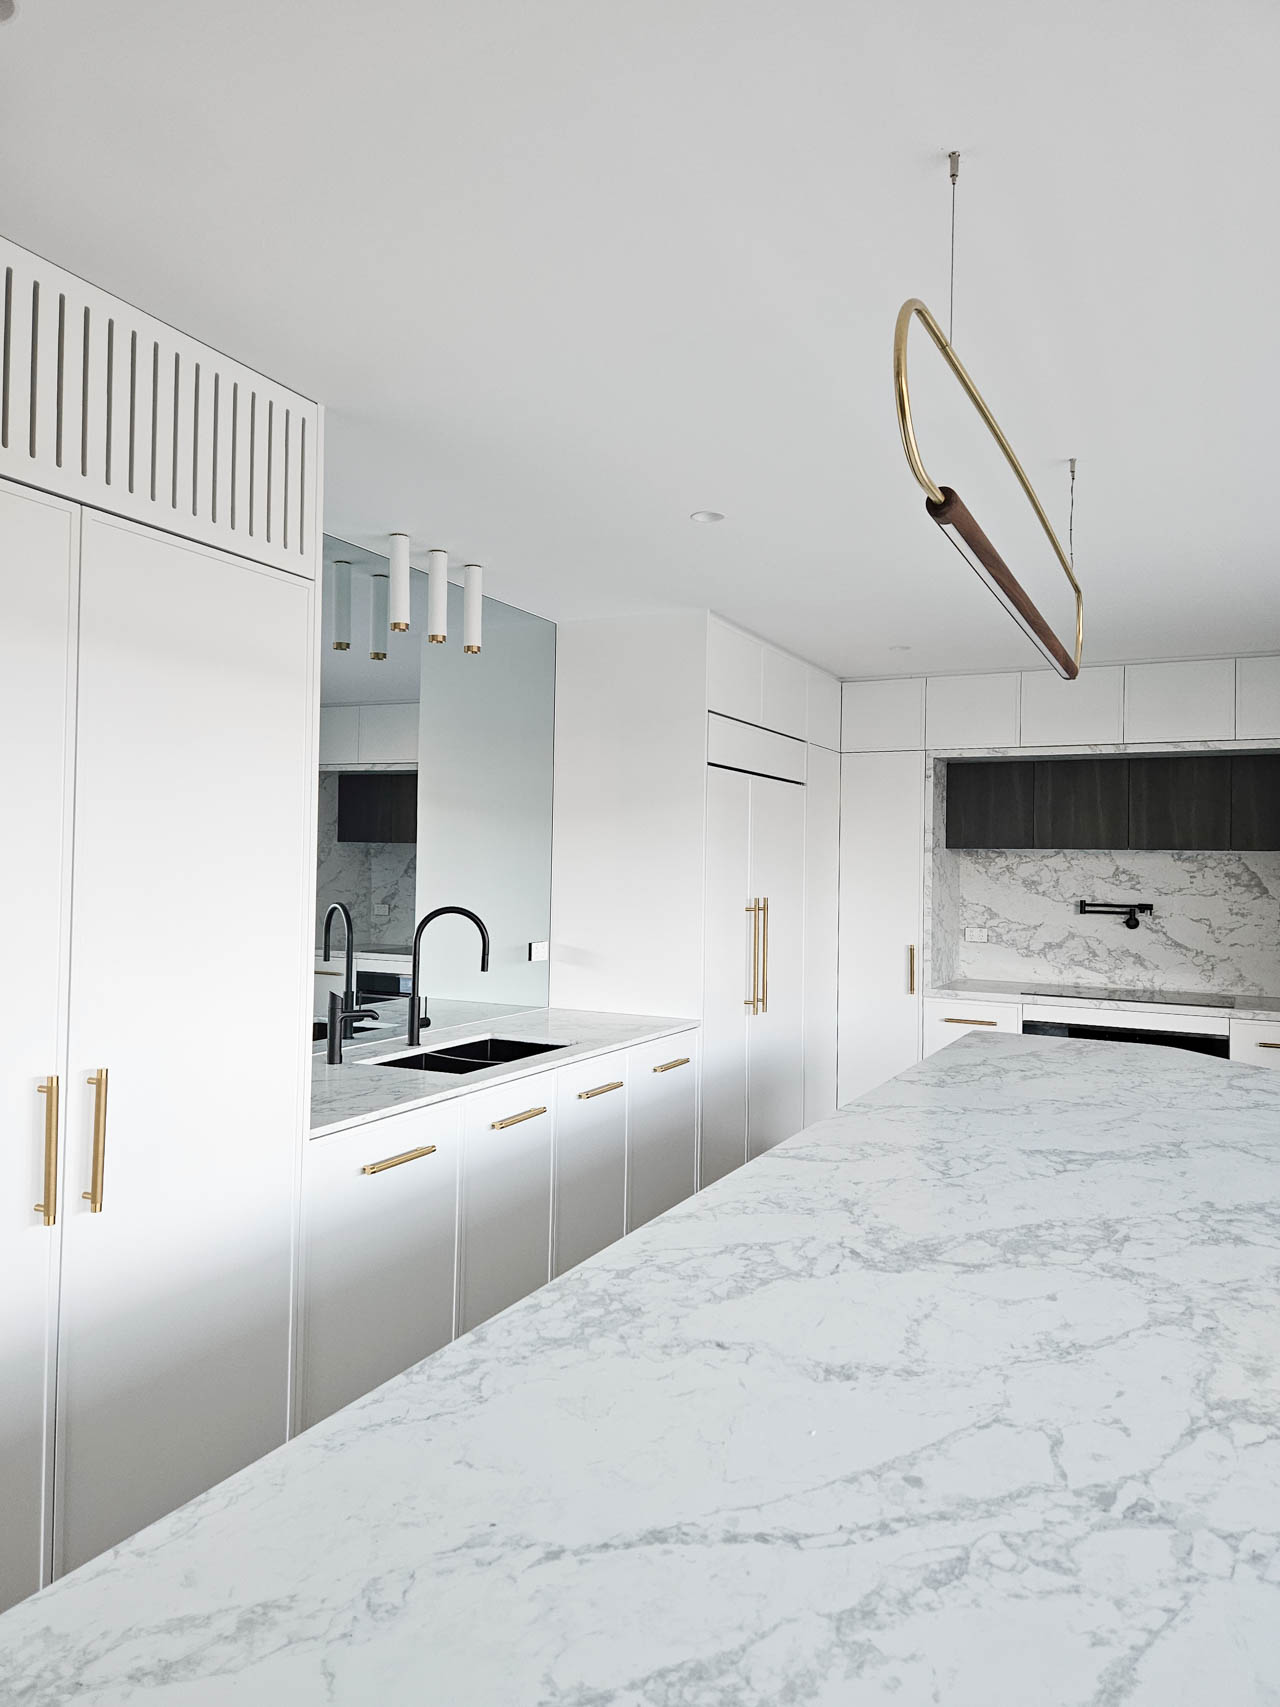
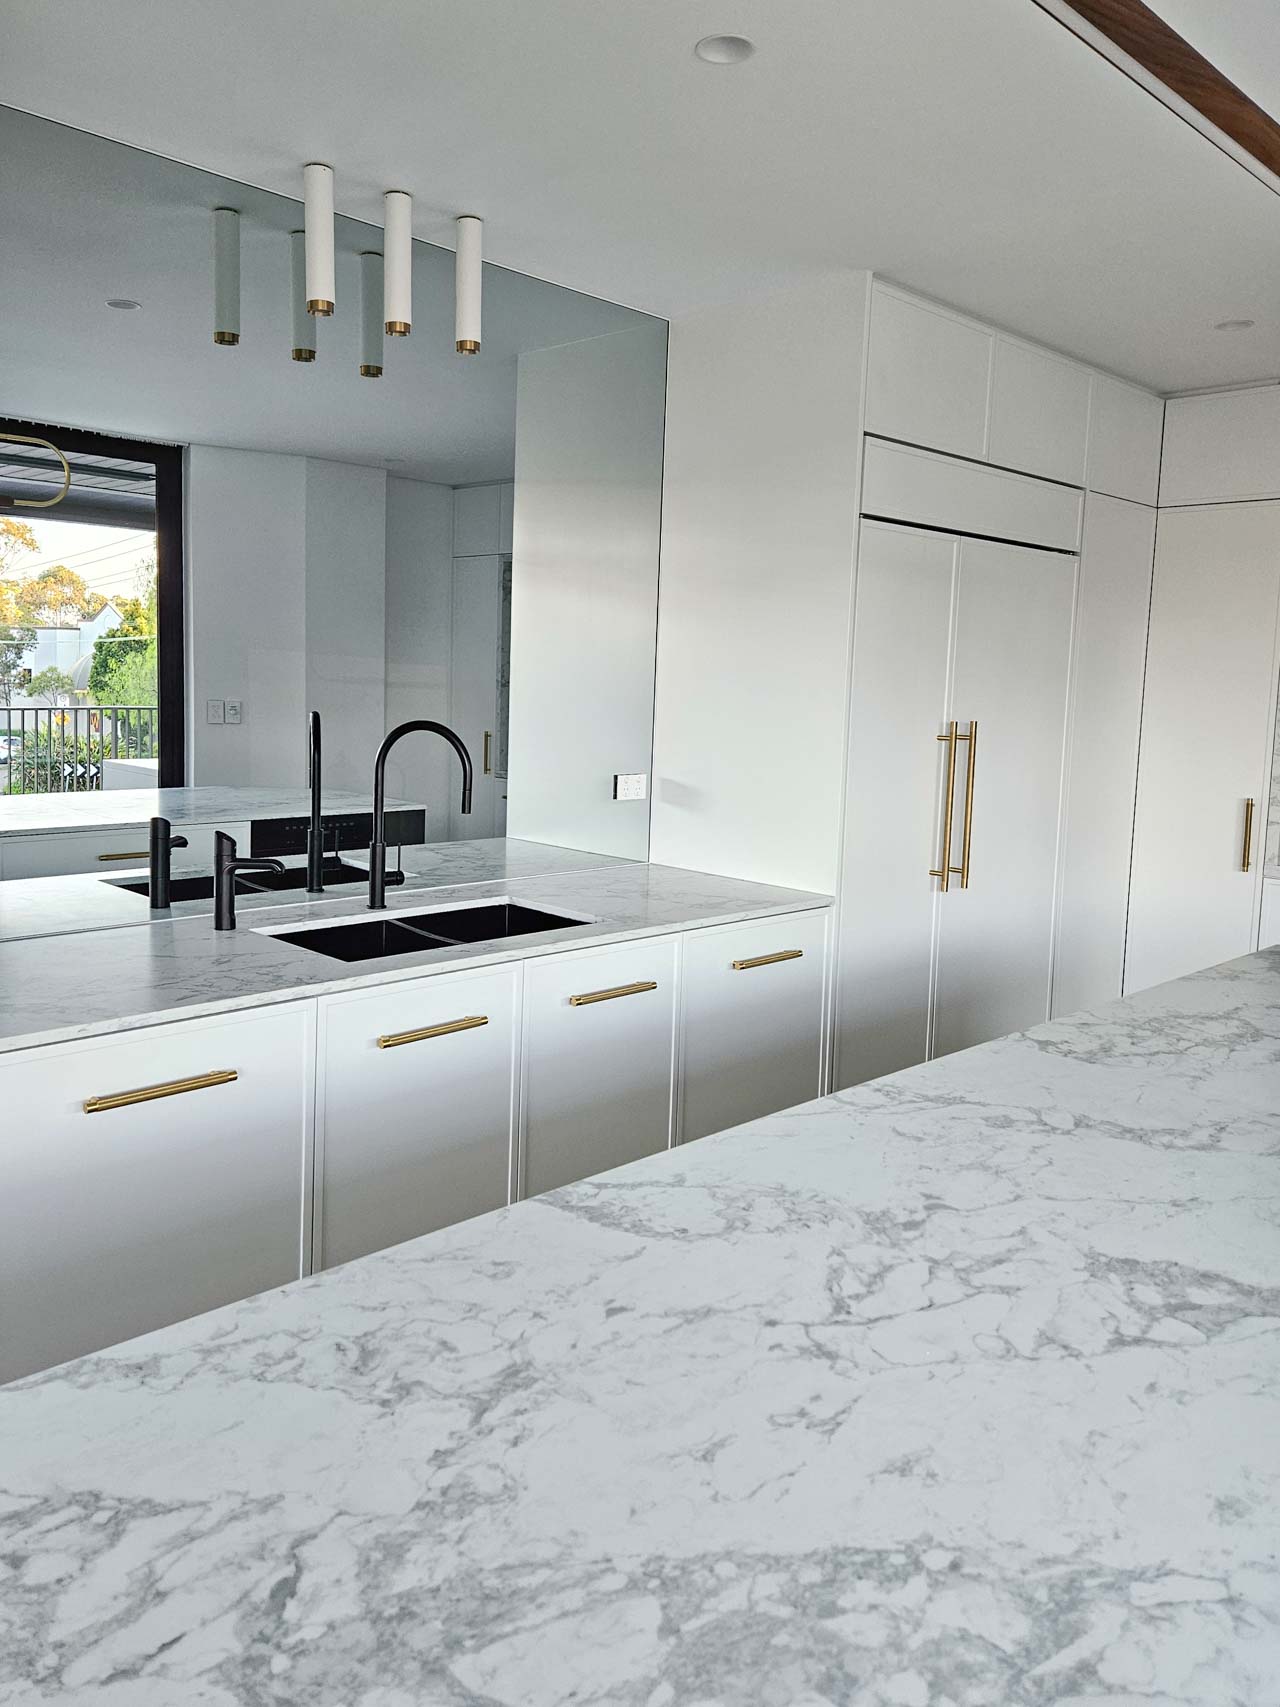
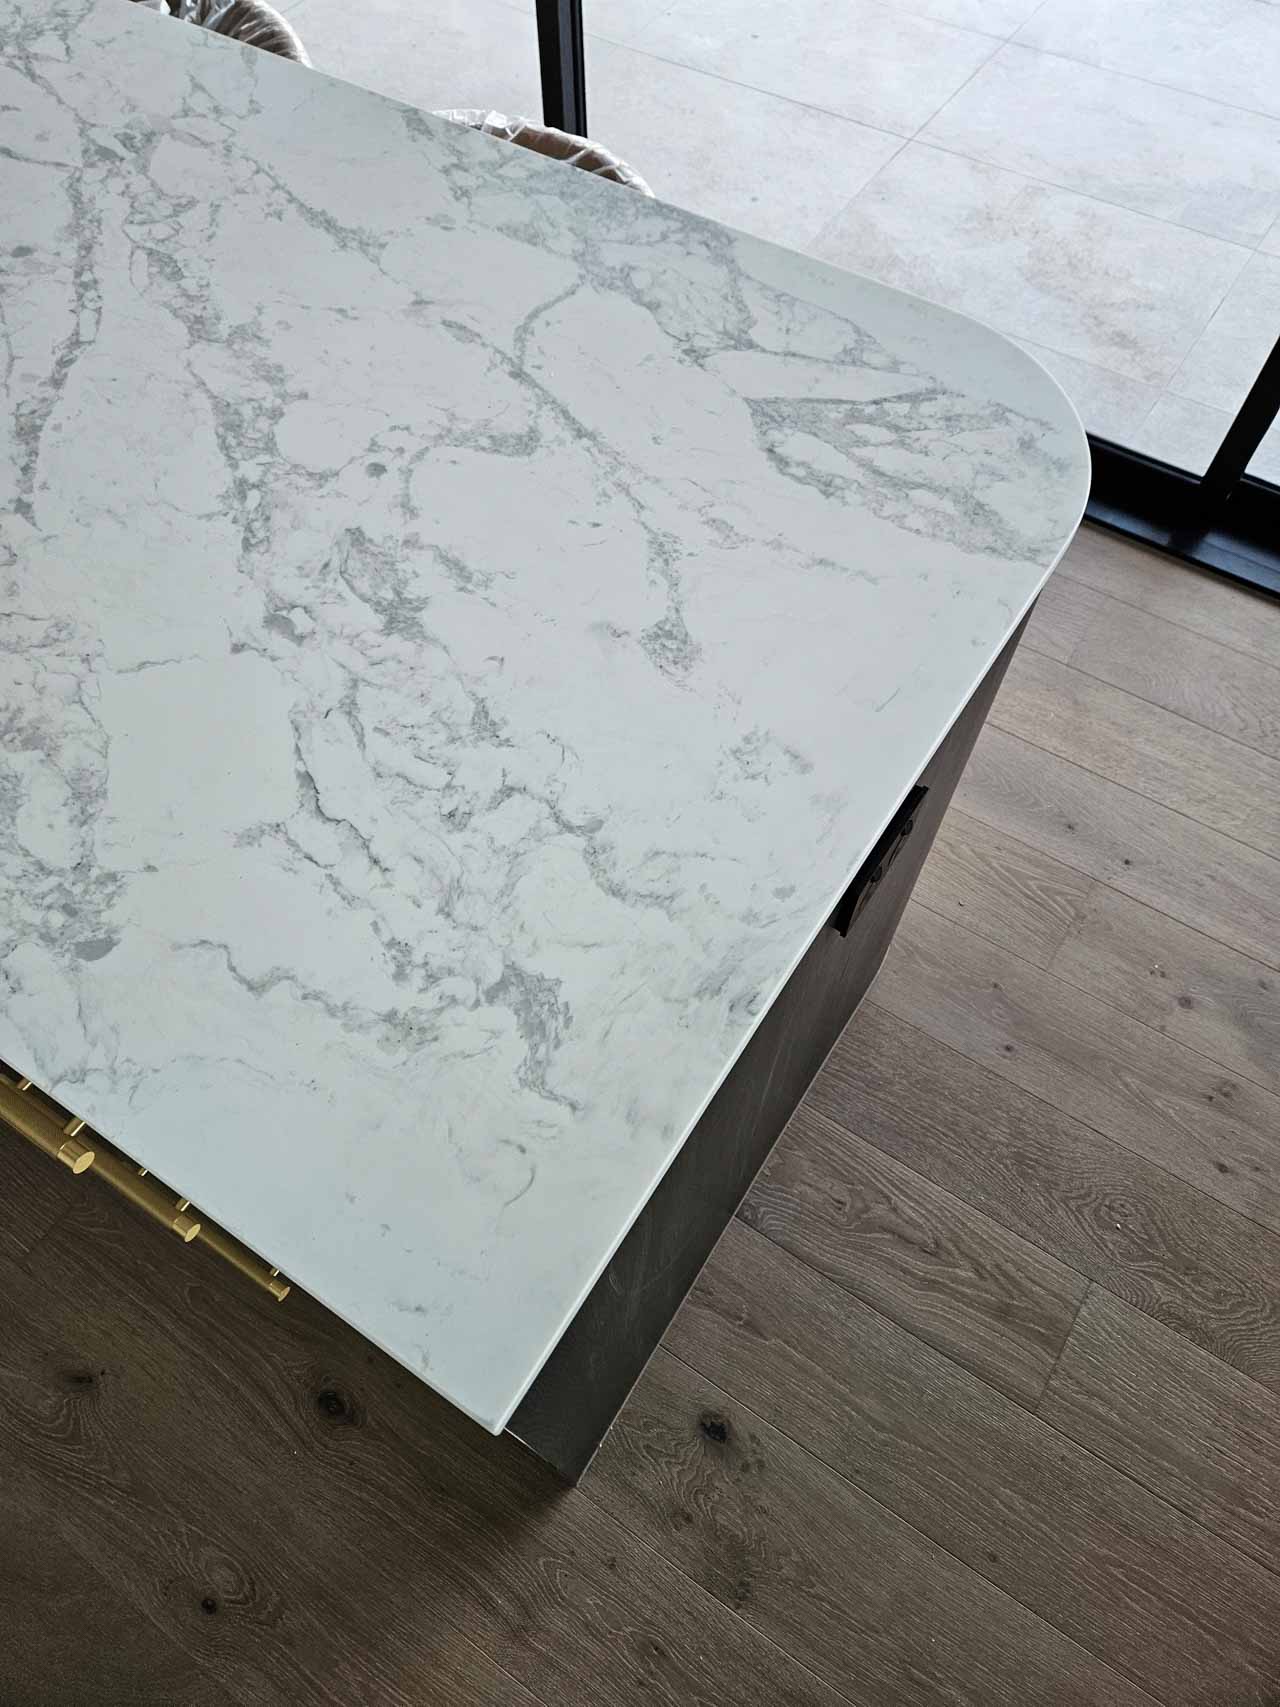
- Calacatta-style marble stone with bold grey veining on a white ground, used for benchtops and splashback
- Matte black fixtures as a deliberate counterpoint to the brass — pot filler, power outlets, light fittings
- Dark engineered timber floors that anchor the light cabinetry and add warmth from below
A kitchen with custom designed cabinetry
Doors and cupboards
The shaker door profile is one of the most widely imitated cabinet styles in the industry and also one of the most poorly executed when taken from flat-pack.
The difference between a custom shaker door and a flat-pack shaker door is immediately apparent to anyone who knows what to look for, and in this kitchen, you know exactly what you’re looking at from the moment you step in.


Bright white door and drawer fronts
Every door and drawer front in the primary kitchen zone is a custom-made shaker profile in a clean, bright white.
The shaker detail (that recessed centre panel framed by a square-edged rail and stile) is crisp, consistent, and perfectly proportioned across every cabinet size.
This consistency is only achievable through precision custom manufacturing, where each door is cut, profiled, and finished to the exact dimensions of its specific cabinet opening.
The profile depth and the reveal (the gap between adjacent door and drawer faces) are uniform throughout, so no misaligned gaps, no varying reveals, no doors that sit proud or recessed from their neighbours.
This is the baseline quality expectation of a custom kitchen. It is also, bluntly, not achievable with flat-pack systems.
Other unique features of this kitchen renovation design
The single most important decision in this renovation was the commitment to fully custom-made cabinetry, and the difference it makes is immediately apparent.
Two-Tone accent cabinetry
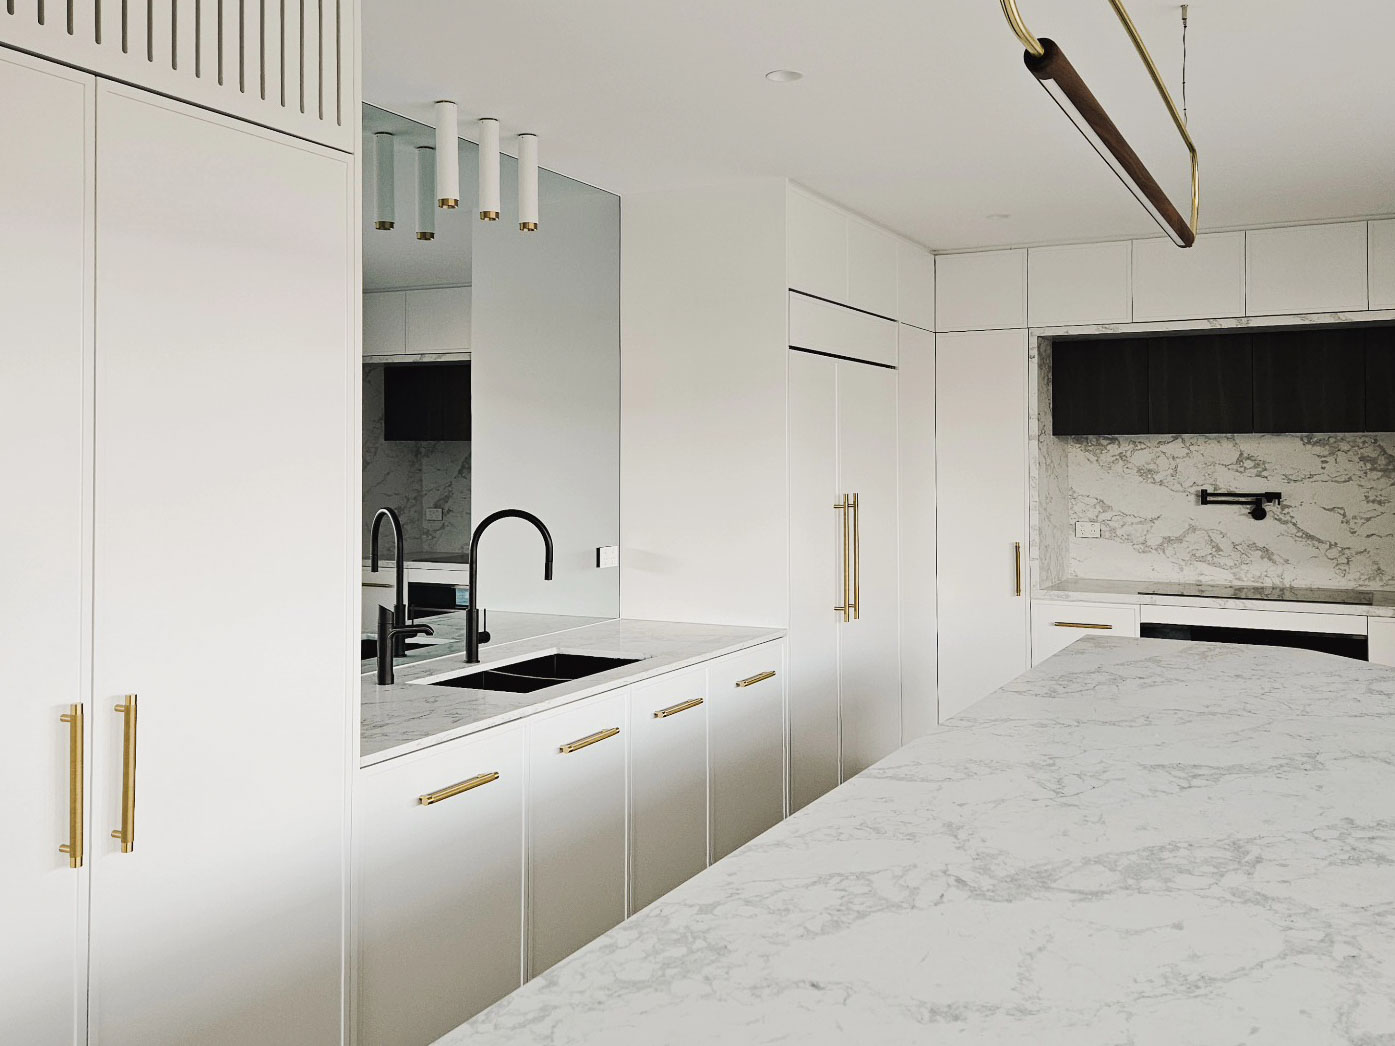
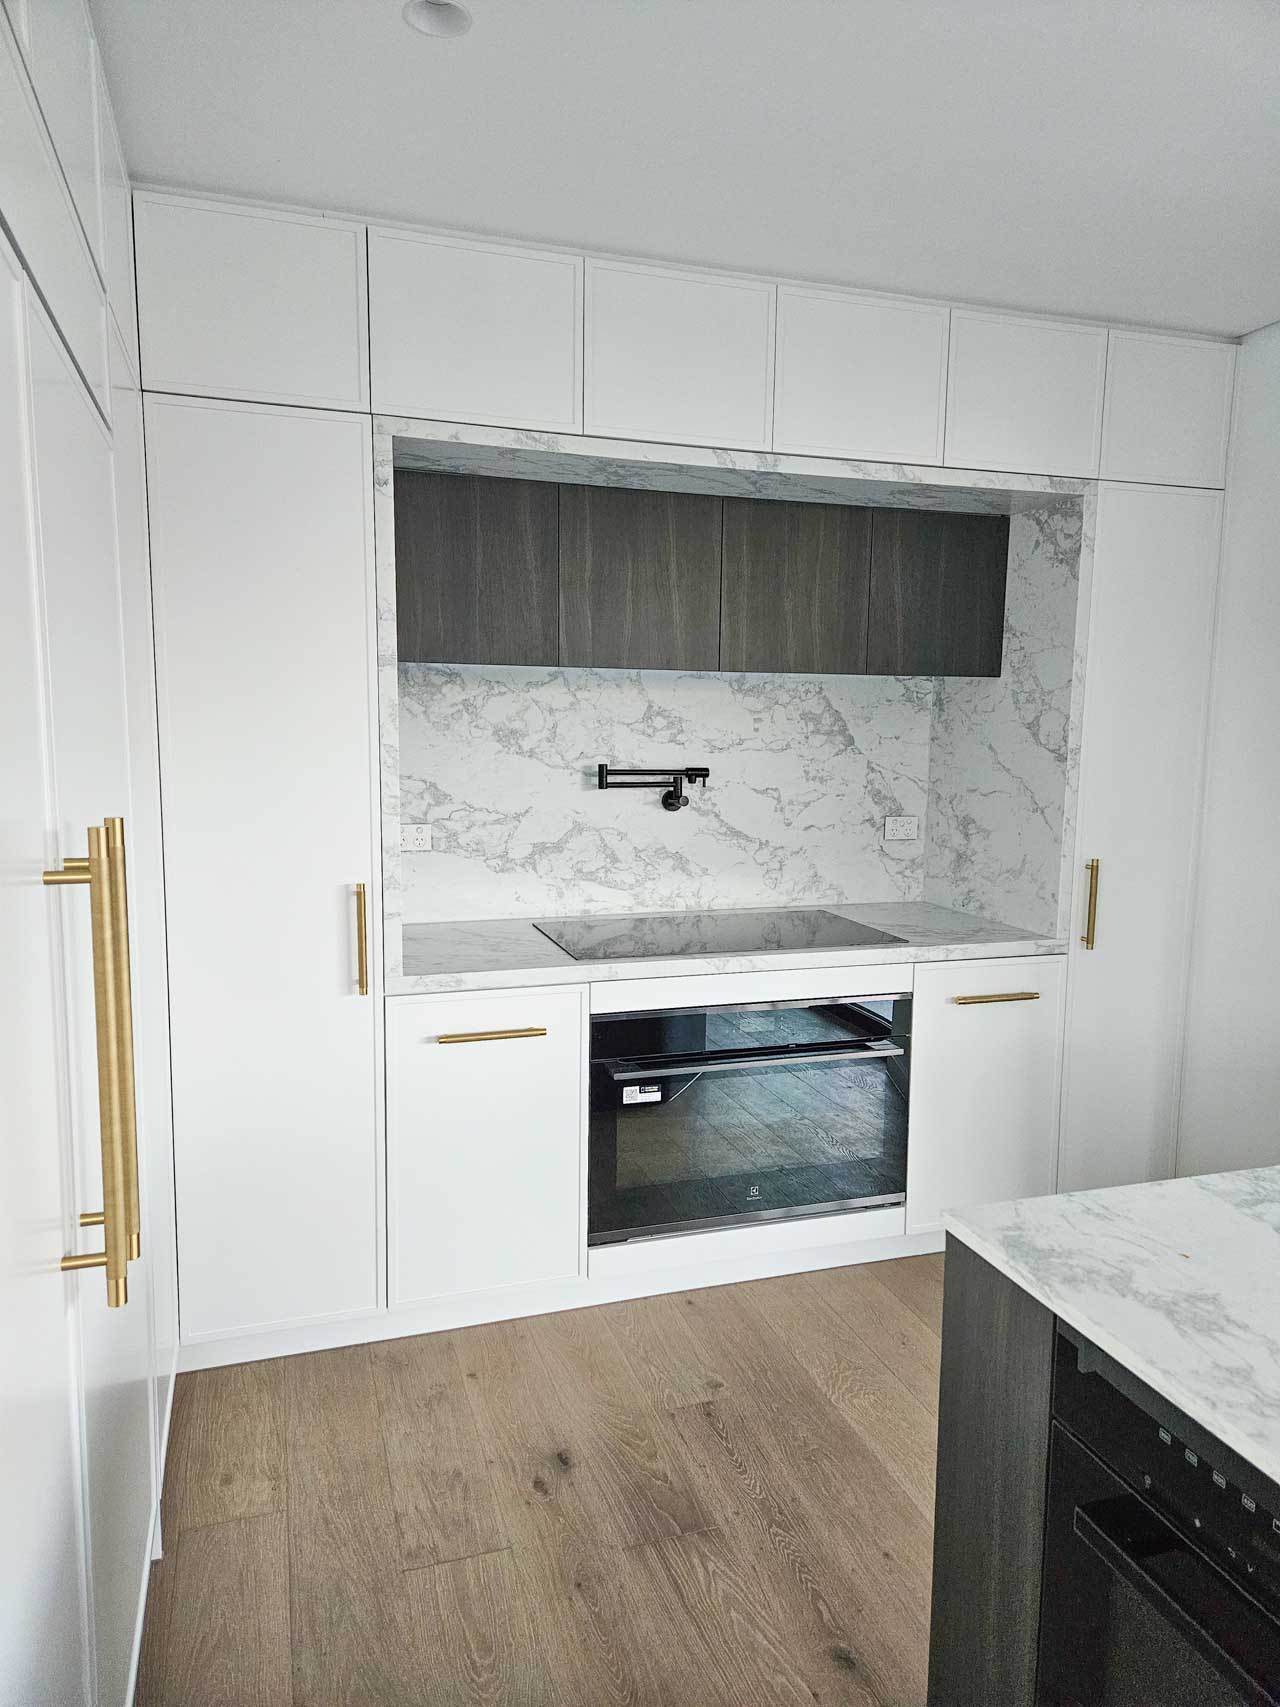
The design introduces a second cabinetry finish in a deep charcoal grey timber grain — used with great restraint and deliberate intent. It appears in two key locations: as the inner upper cabinets within the cooking alcove recess, and as the end panel cladding on the island bench.
This two-tone approach is a hallmark of thoughtful, considered kitchen design. Rather than applying the same finish everywhere and creating a flat, one-dimensional result, the dark charcoal creates visual depth, frames the cooking zone as a distinct architectural feature, and gives the island bench a grounded, furniture-like quality. The dark end panel also serves a practical purpose: it conceals inevitable scuffing and contact marks at the most-touched corner of the kitchen.
Floor-to-Ceiling cooking alcove
The cooking zone is framed by a full surround of white cabinetry that runs from floor to ceiling, creating an alcove effect that recalls the built-in kitchen hearths of traditional Hamptons architecture. The outer white cabinets and tower columns house the integrated refrigerator on one side and additional pantry storage on the other. Within this frame, the inner upper cabinets — in contrasting dark charcoal — recede into the alcove, creating a sense of depth and visual layering that a flat, continuous run of cabinetry simply cannot achieve.
Every cabinet in this arrangement was built to the exact dimensions of the space. The ceiling height, the depth of the alcove, the width of each column tower — all were designed and manufactured specifically for this room.
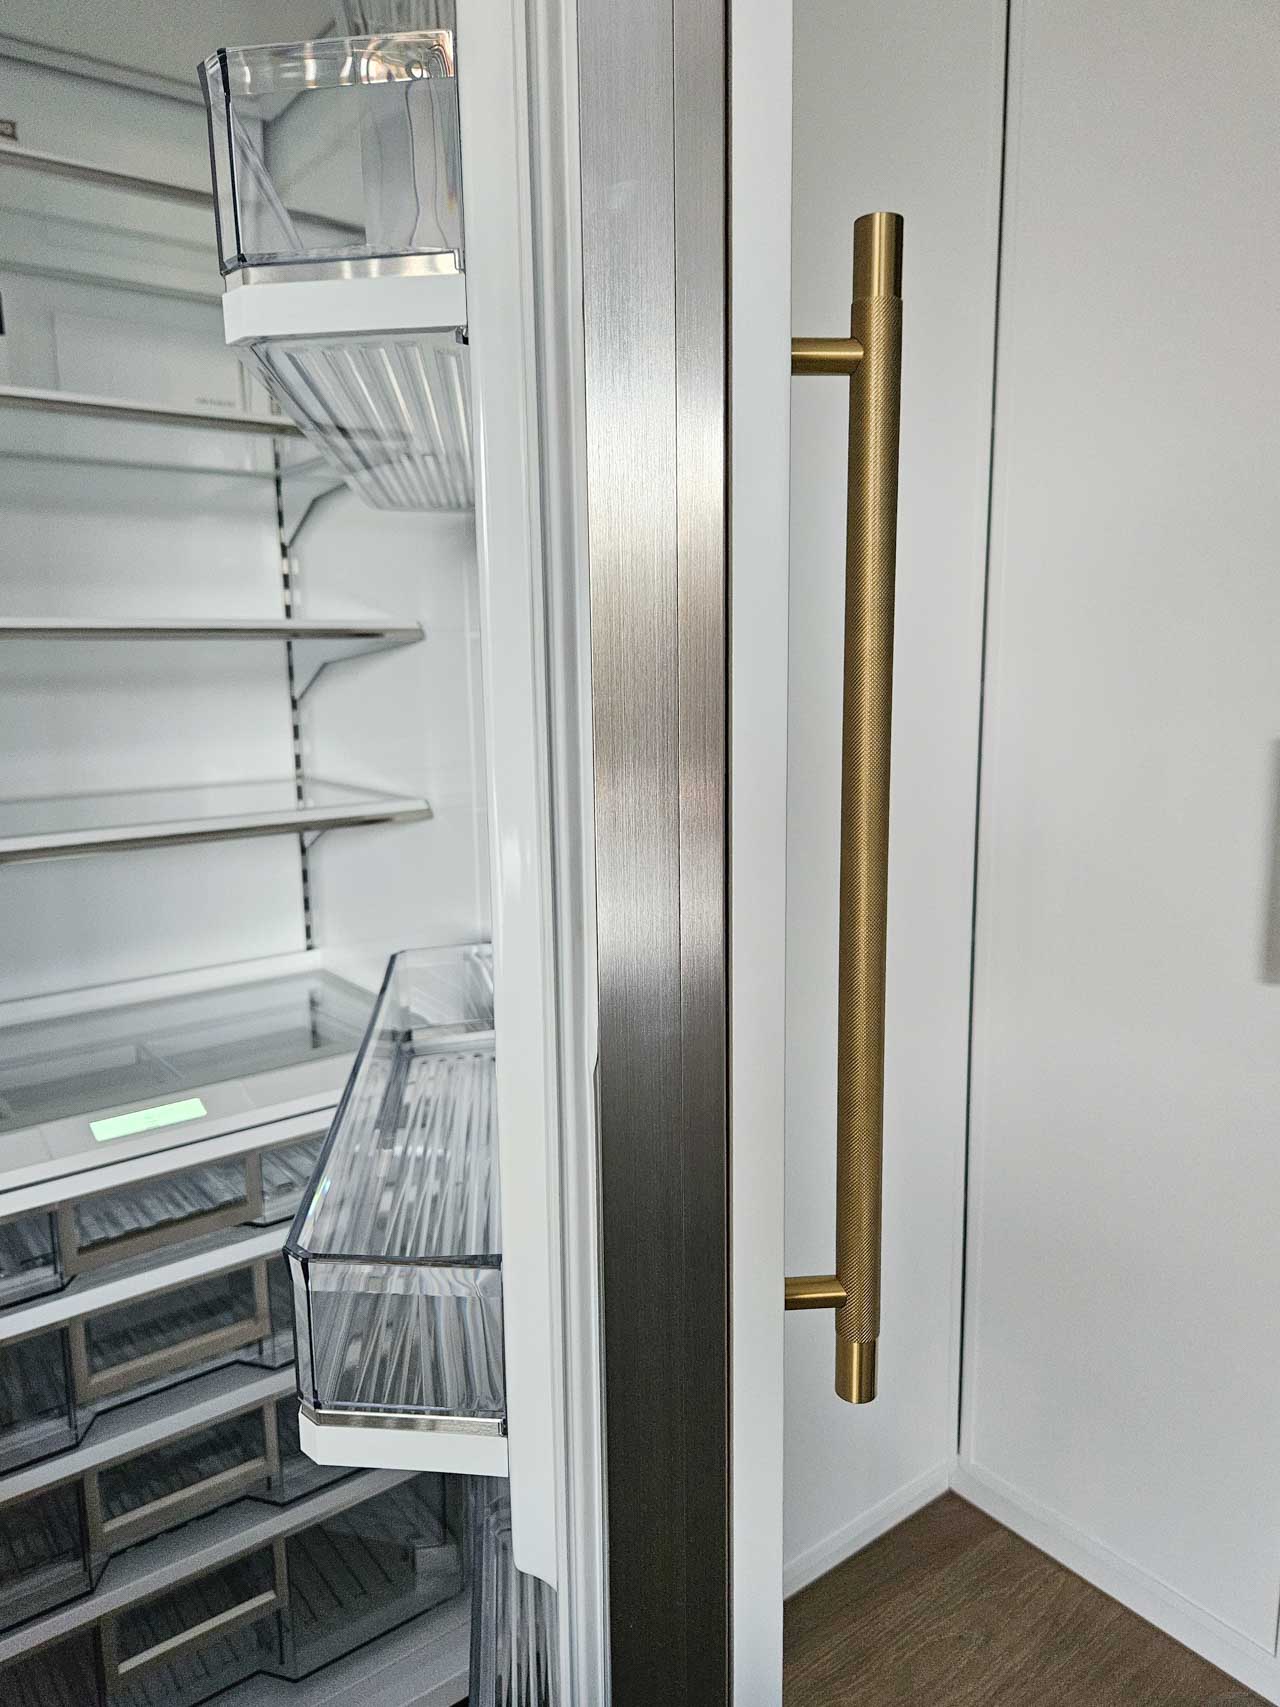
Integrated refrigerator panels
The refrigerator is fully integrated behind custom-made cabinet panels that match the surrounding shaker cabinetry exactly. When the door is closed, the fridge disappears entirely into the kitchen — nothing breaks the visual line of the cabinetry run. The panels were made to wrap seamlessly around the appliance, with a matching overhead cabinet boxing the fridge into the full-height column format.
This level of integration demands precise coordination between the cabinet manufacturer and the appliance supplier. The panel dimensions, hinge positions, and door clearances must all be resolved before a single board is cut. It cannot be retrofitted after the fact, and it cannot be achieved with standard flat-pack components.
Can the handles in a kitchen be a feature?

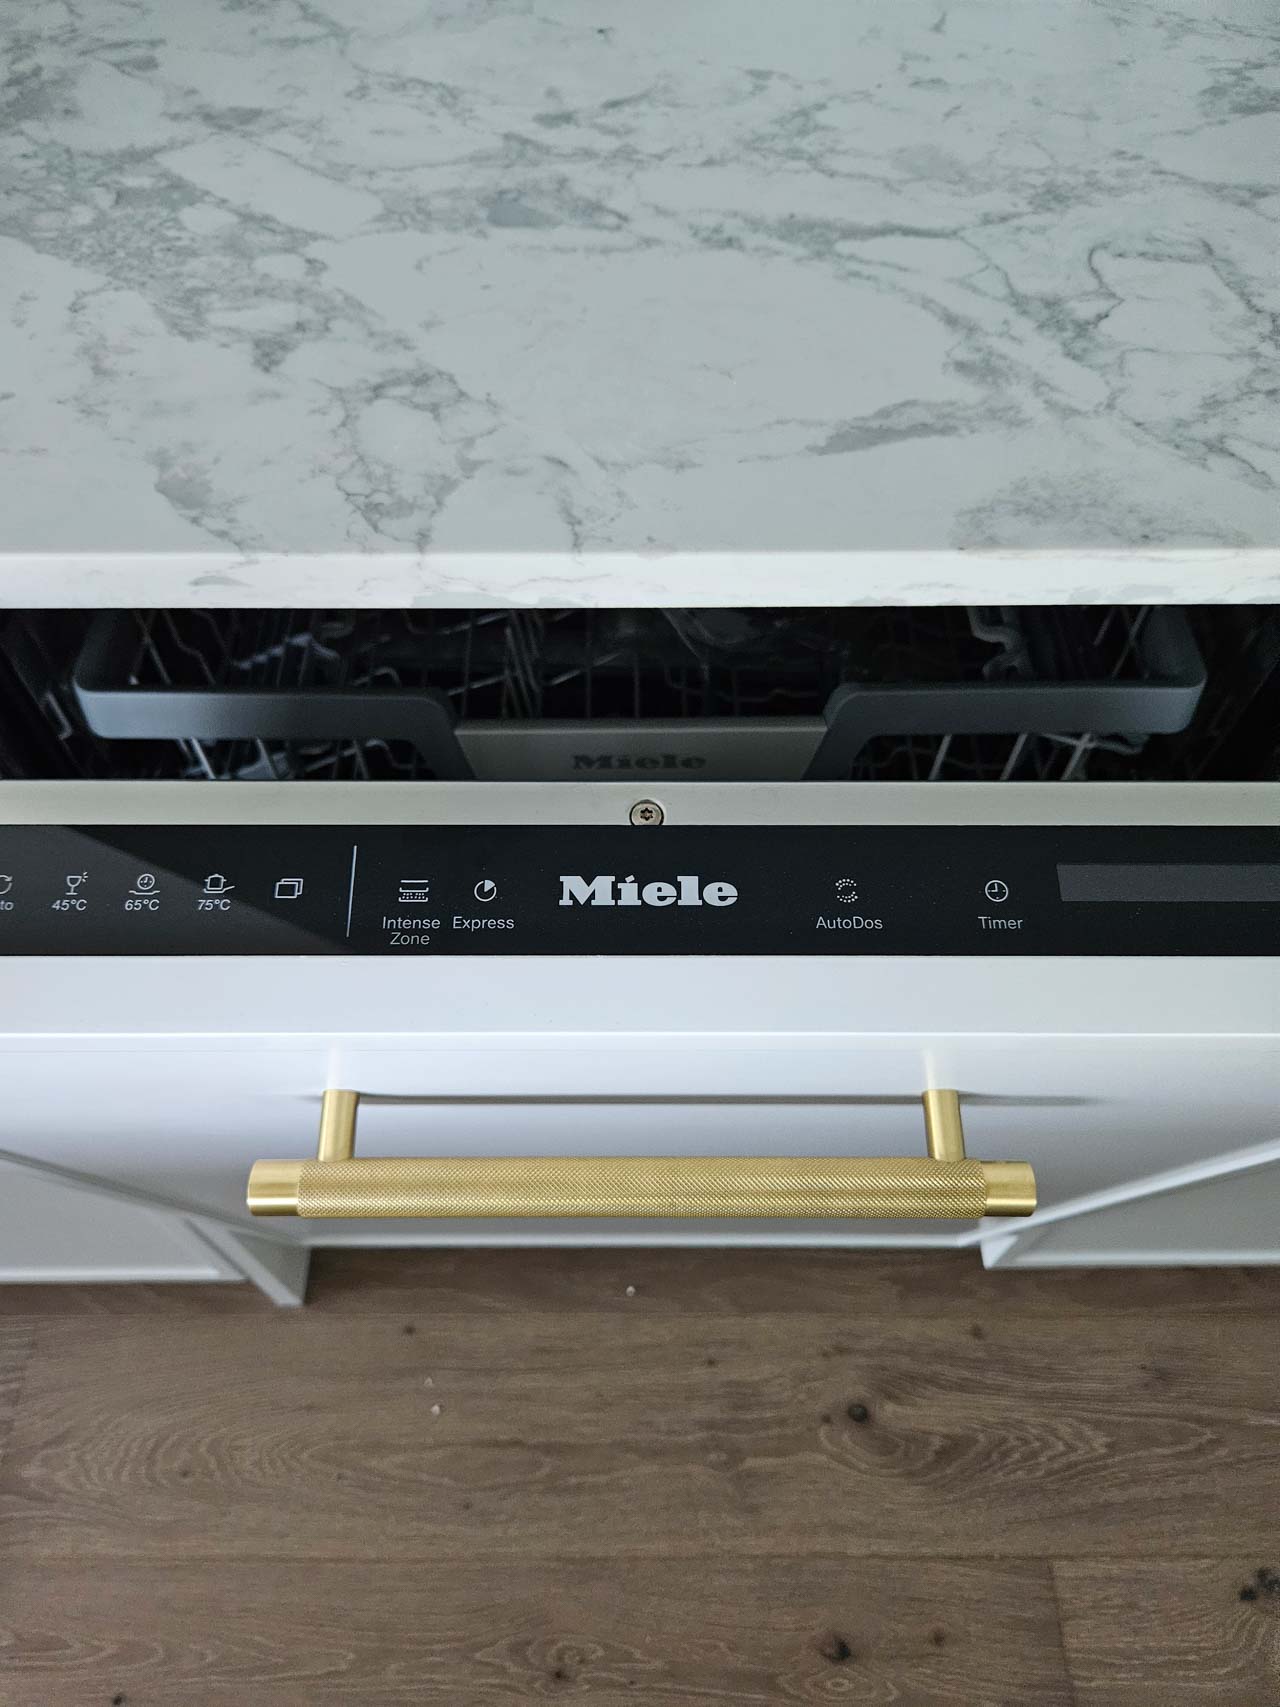
If there is one element in this kitchen that deserves to stop a visitor in their tracks, it is the hardware. The handles throughout this kitchen are knurled T-bar pulls in brushed brass — and they are exceptional.
Knurling is a machined diamond-cut texture applied to the surface of the handle barrel, creating a tactile grip pattern that catches the light differently depending on the angle. It is a detail borrowed from precision engineering and fine watchmaking, and it brings an unmistakable sense of quality and craftsmanship to every interaction with the cabinetry. Every time you open a drawer, you feel it.
That is intentional design.
The handles are used across all three scales in the kitchen. Long bar pulls on the integrated fridge panels and tall pantry doors make a bold architectural statement. Mid-length pulls on the drawer banks provide a confident horizontal accent. Shorter pulls on the lower drawer faces maintain the rhythm without overcrowding. The consistency of the finish — warm, matte brushed brass without any yellow or orange tones — ties every handle together as a cohesive family across the entire kitchen.
These handles are not off-the-shelf items from a hardware chain. They are premium architectural hardware sourced from specialist suppliers, and their installation requires precise drilling, alignment, and fixing across every cabinet face. In a shaker profile kitchen, where the door geometry is visible and precise, a misaligned handle is immediately obvious. In this kitchen, every handle is perfectly centred and perfectly level.
Using stone in a kitchen renovation

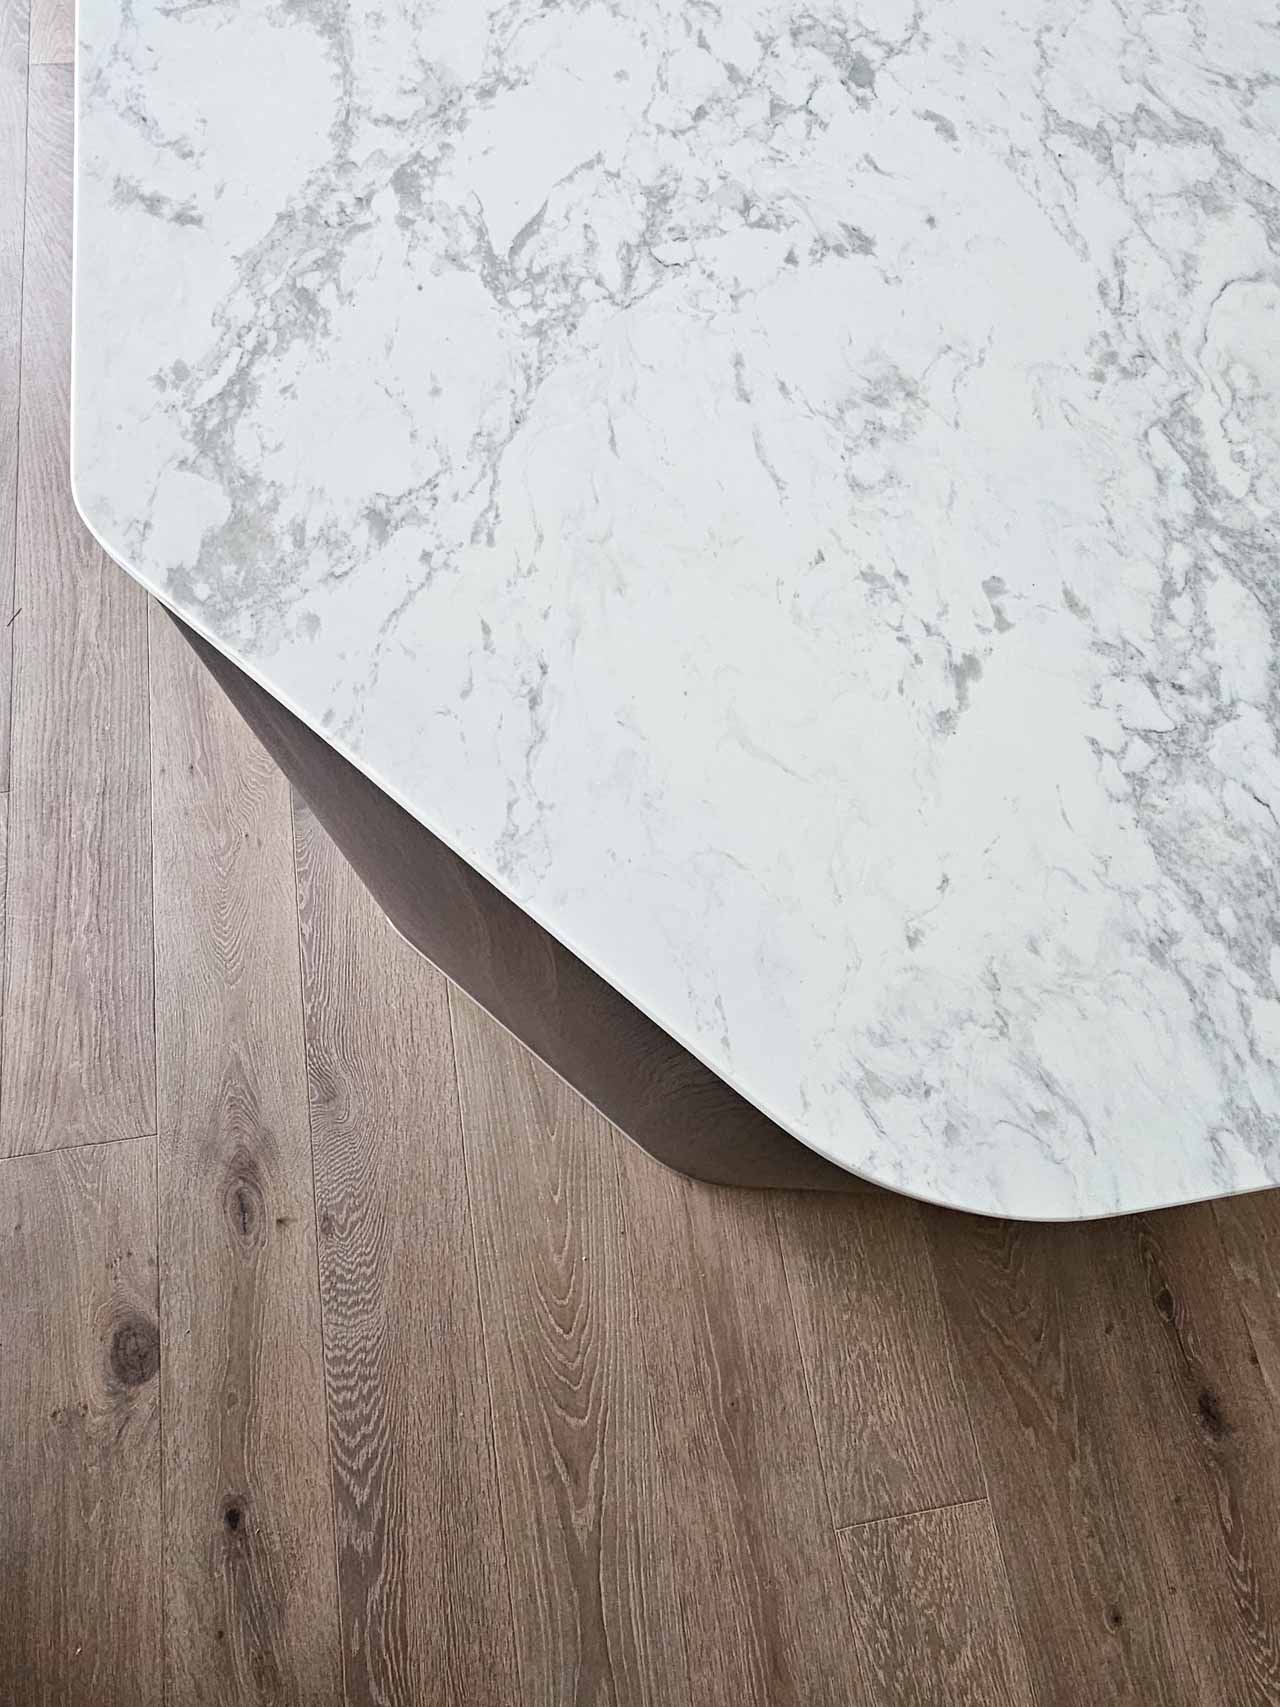
The benchtops, island surface, and full-height cooking splashback are all dressed in a Calacatta-style natural stone or porcelain slab in brilliant white with dramatic grey and taupe veining sweeping boldly across the surface.
This is not a subtle stone. It is confident, graphic, and high-contrast — chosen deliberately to hold its own against the dark charcoal timber accents and the strong two-tone cabinetry. In a softer, more minimal kitchen it might dominate. Here, it belongs completely.
The full-height splashback Rather than tiles, the cooking alcove is lined with a continuous slab of the same stone, running from the benchtop surface up to the underside of the upper cabinets. The veining flows upward without interruption — no grout lines, no tile joints, nothing to break the surface. This is both a practical and aesthetic decision: a single slab splashback is far easier to keep clean than a tiled surface, and it reads as a feature in its own right rather than a functional necessity.
The island bench The island bench is topped with the same Calacatta slab, with the dark charcoal timber end panel creating a deliberate contrast underneath. The stone overhangs slightly to the seating side, providing comfortable knee clearance for bar stools, with the marble edge profile finished sharp and clean.
The island bench showcases the two-tone design language at its clearest. The primary face presents white shaker drawers in a bank of three, each fitted with the knurled brass handles — maximum storage, maximum character. The end panel facing the alfresco area wraps in the dark charcoal timber grain, creating a clean, furniture-quality face that transitions the kitchen towards the outdoor living space.
The island end panel also features a flush-mounted matte black dual power outlet — not the standard white plastic outlet that builders typically specify. The matte black finish ties the electrical fitting to the matte black palette introduced by the pot filler and other black fixtures throughout the space, showing the level of detail and coordination that goes into a genuine custom renovation.
Nothing is an afterthought.
How our renovation company designed and built this kitchen
A project of this scope — custom cabinetry throughout, integrated appliances, stone benchtops and splashbacks, a pot filler installation, study nook, and a full two-tone design scheme — requires the coordination of multiple licensed trades over several weeks. Here is what the renovation process looks like from start to finish:
- Design & Consultation — Initial meeting to understand the family’s brief, lifestyle, and budget. Floor plans, cabinetry layouts, and material selections are developed in detail. Hardware, stone, appliances, flooring, and fixtures are all chosen and confirmed before any work begins.
- Demolition — The existing kitchen is stripped back to bare walls and subfloor. Old cabinetry, benchtops, appliances, tiles, and any relevant floor coverings are removed and cleared from site.
- Structural & Ceiling Works — Any ceiling modifications, bulkhead removals, or wall changes are carried out before trades begin. Recessed downlight positions are confirmed and marked out.
- Plumbing Rough-In — The plumber relocates or extends water supply and waste lines to the new sink position on the island bench and the pot filler supply point on the cooking wall. All rough-in is inspected and confirmed before walls are closed.
- Electrical Rough-In — New circuits are run for the induction cooktop, oven, integrated refrigerator, dishwasher, island power outlets, and any other electrical requirements. Data and USB points for the study nook are confirmed and wired at this stage.
- Flooring Installation — Engineered timber is laid throughout the kitchen and connecting areas before cabinet installation, ensuring a seamless floor without visible cabinet kickboard lines.
- Cabinet Manufacturing — While site works proceed, the custom cabinetry is being precision-manufactured in the Nu Trend workshop. Shaker door profiles are routed, finished, and quality-checked. Every carcass is assembled, edged, and drilled to the exact dimensions required for this specific home.
- Cabinet Installation — Cabinetry is delivered to site and installed over multiple days. Floor-to-ceiling columns are erected, wall cabinets are levelled and secured, and drawer bank units are positioned and fixed. All scribing and fitting to walls, ceilings, and floors is carried out to achieve the seamless built-in result.
- Appliance Integration & Panel Fitting — The integrated refrigerator, oven, cooktop, and dishwasher are positioned and connected. Custom panels are fitted to the refrigerator and tested for alignment and operation.
- Stonemason Templating — Once all cabinetry is installed, the stonemason attends site to template every benchtop run, the island, and the full-height splashback zone. The stone slabs are then cut and fabricated to these exact templates in the stonemason’s workshop.
- Stone Installation — Benchtops, island top, and full-height splashback panels are installed, mitred, and adhered. The stone is inspected for consistency of veining placement and any seam positions are confirmed with the client before cutting.
- Electrical Fit-Off — The electrician returns to install recessed downlights, the pendant light fittings, island and study nook power outlets, and all switches. Matte black outlet plates and switch plates are fitted to maintain finish consistency.
- Plumbing Fit-Off — Sink, tapware, pot filler, and dishwasher connections are installed and tested. The pot filler is positioned and mounted into the stone splashback at the confirmed height.
- Hardware Installation — Every handle, hinge, and soft-close runner is installed and adjusted. The knurled brass hardware is fitted, aligned, and tightened across all cabinet faces.
- Snagging & Final Inspection — The complete kitchen is inspected in detail. Any adjustments to door alignment, drawer levelling, or finish touch-ups are carried out. The space is cleaned and prepared for handover.
- Client Handover — Nu Trend walks the homeowners through their new kitchen, covering appliance operation, care and maintenance of the stone, and any warranty documentation.

